Air-Fried Shrimp Tacos

Air-Fried Shrimp Tacos

Air-fried shrimp tacos are a delicious, high-protein dinner option packed with flavor and healthy ingredients. The air fryer makes the shrimp perfectly crispy without the need for excess oil, while the whole-wheat tortillas and fresh toppings create a balanced and nutritious meal.

Prep Time: 15 minutes
Cook Time: 10 minutes
Portions: 4
Glycemic Index (GI): 40 (Low)
Glycemic Load (GL): 6 (Low)

Ingredients:

  • 1 pound shrimp, peeled and deveined
  • 1 teaspoon cumin
  • 1 teaspoon paprika
  • 1 teaspoon garlic powder
  • 2 tablespoons olive oil
  • Whole-wheat tortillas
  • Optional Toppings:
    • Shredded cabbage and carrot slaw
    • Avocado slices
    • Lime wedges
    • Yogurt-based cilantro lime sauce (Greek yogurt, chopped cilantro, lime juice, pinch of salt)

Instructions:

  1. Marinate the Shrimp:
    • Prepare Marinade: In a mixing bowl, combine the olive oil, cumin, paprika, and garlic powder.
    • Coat the Shrimp: Add the shrimp to the bowl and toss until evenly coated. Let marinate for about 10 minutes to allow the flavors to infuse.
  2. Preheat the Air Fryer:
    • Preheat your air fryer to 400°F (200°C).
  3. Cook the Shrimp:
    • Arrange in Air Fryer: Place the shrimp in a single layer in the air fryer basket, making sure they do not touch.
    • Air Fry: Cook for 5-7 minutes, shaking the basket halfway through. The shrimp should be opaque and slightly crispy on the outside.
  4. Prepare the Toppings:
    • Shredded Slaw: Toss shredded cabbage and carrots with lime juice and a pinch of salt.
    • Yogurt Sauce: In a small bowl, mix Greek yogurt with chopped cilantro, lime juice, and salt to taste.
  5. Assemble the Tacos:
    • Warm the Tortillas: Warm the whole-wheat tortillas in a dry skillet or the air fryer until they are pliable.
    • Add Shrimp and Toppings: Place a few shrimp in the center of each tortilla. Add shredded slaw, avocado slices, and a drizzle of the yogurt-based cilantro lime sauce.
    • Serve with Lime Wedges: Garnish with lime wedges for a burst of fresh citrus flavor.

Enjoy these crispy, flavorful air-fried shrimp tacos as a healthy, diabetic-friendly dinner that’s perfect for any occasion!
Herb-Crusted Chicken Breasts

Herb-Crusted Chicken Breasts (Air Fryer Version)

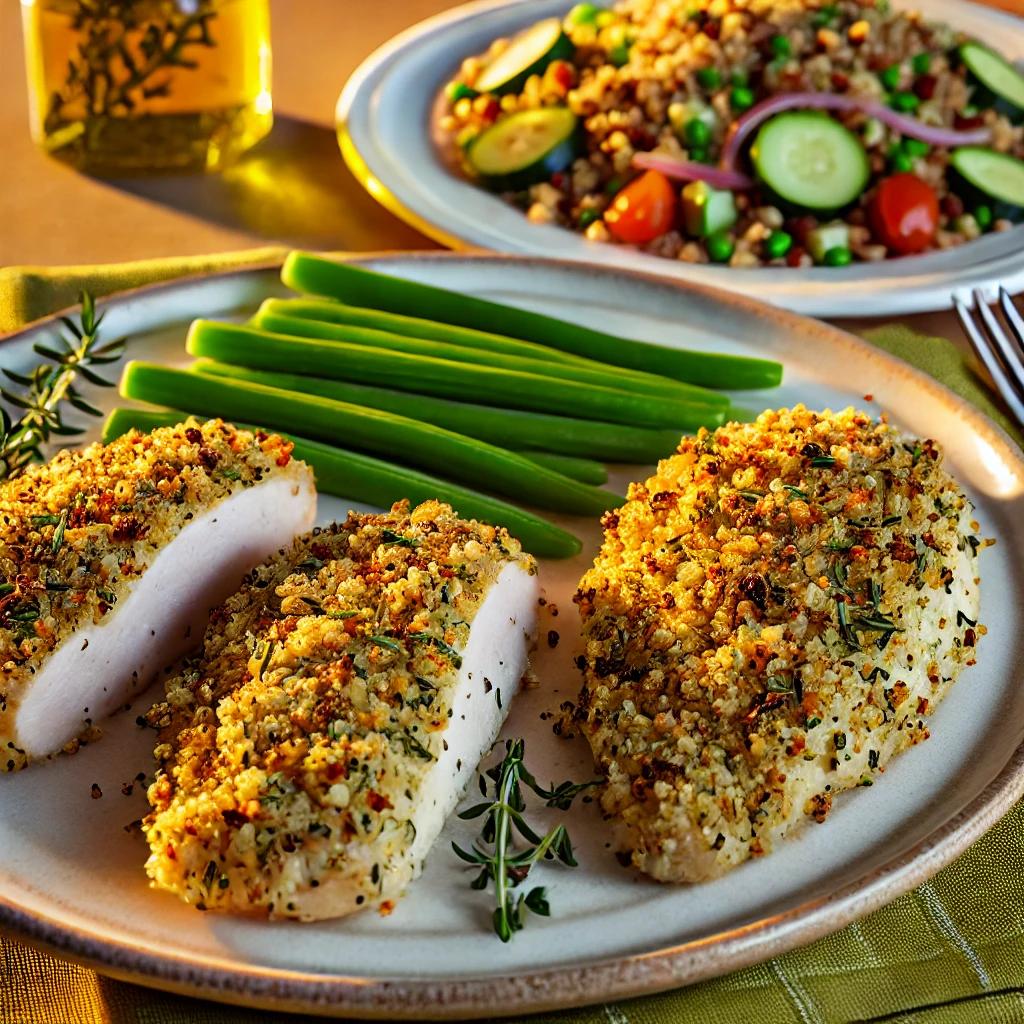
Herb-crusted chicken breasts are a perfect healthy dinner option, combining lean protein with a delicious crispy crust. The combination of fresh herbs, panko breadcrumbs, and a hint of lemon zest creates a flavorful dish that supports muscle maintenance and overall health.

Prep Time: 15 minutes
Cook Time: 20 minutes
Portions: 4
Glycemic Index (GI): 35 (Low)
Glycemic Load (GL): 4 (Low)

Ingredients:

  • 4 boneless, skinless chicken breasts
  • 2 tablespoons olive oil
  • Zest of 1 lemon
  • 1 cup panko breadcrumbs
  • Fresh herbs: rosemary, thyme, and parsley, finely chopped
  • Salt and pepper, to taste
  • Cooking spray

Instructions:

  1. Prepare the Herb Crust:
    • Mix Herbs and Breadcrumbs: In a shallow dish, combine the chopped fresh herbs and panko breadcrumbs.
    • Mix Olive Oil and Lemon Zest: In another shallow dish, mix the olive oil and lemon zest.
  2. Coat the Chicken Breasts:
    • Dip in Olive Oil Mixture: Dip each chicken breast into the olive oil and lemon zest mixture, making sure it is well-coated.
    • Coat with Breadcrumbs: Press the chicken breast into the breadcrumb and herb mixture, ensuring it’s coated evenly on all sides.
  3. Preheat the Air Fryer:
    • Preheat your air fryer to 375°F (190°C).
    • Lightly spray the air fryer basket with cooking spray.
  4. Cook the Chicken:
    • Place in Air Fryer: Place the coated chicken breasts in the air fryer basket, ensuring they do not touch for even cooking.
    • Air Fry: Cook for about 20 minutes, flipping halfway through. The internal temperature should reach 165°F (74°C) to ensure the chicken is fully cooked.
  5. Serve with Sides:
    • Green Beans: Steam green beans until tender-crisp. Season with sea salt and a drizzle of olive oil.
    • Quinoa Salad: Cook 1 cup of quinoa according to the package instructions. Once cooled, toss with chopped cucumber, cherry tomatoes, red onion, and a light vinaigrette made from olive oil and lemon juice.

Enjoy these crispy, herb-infused chicken breasts with a side of green beans and a quinoa salad for a balanced, healthy meal that supports your health goals!

Mediterranean Stuffed Peppers

Mediterranean Stuffed Peppers

Mediterranean Stuffed Peppers (Air Fryer Version)

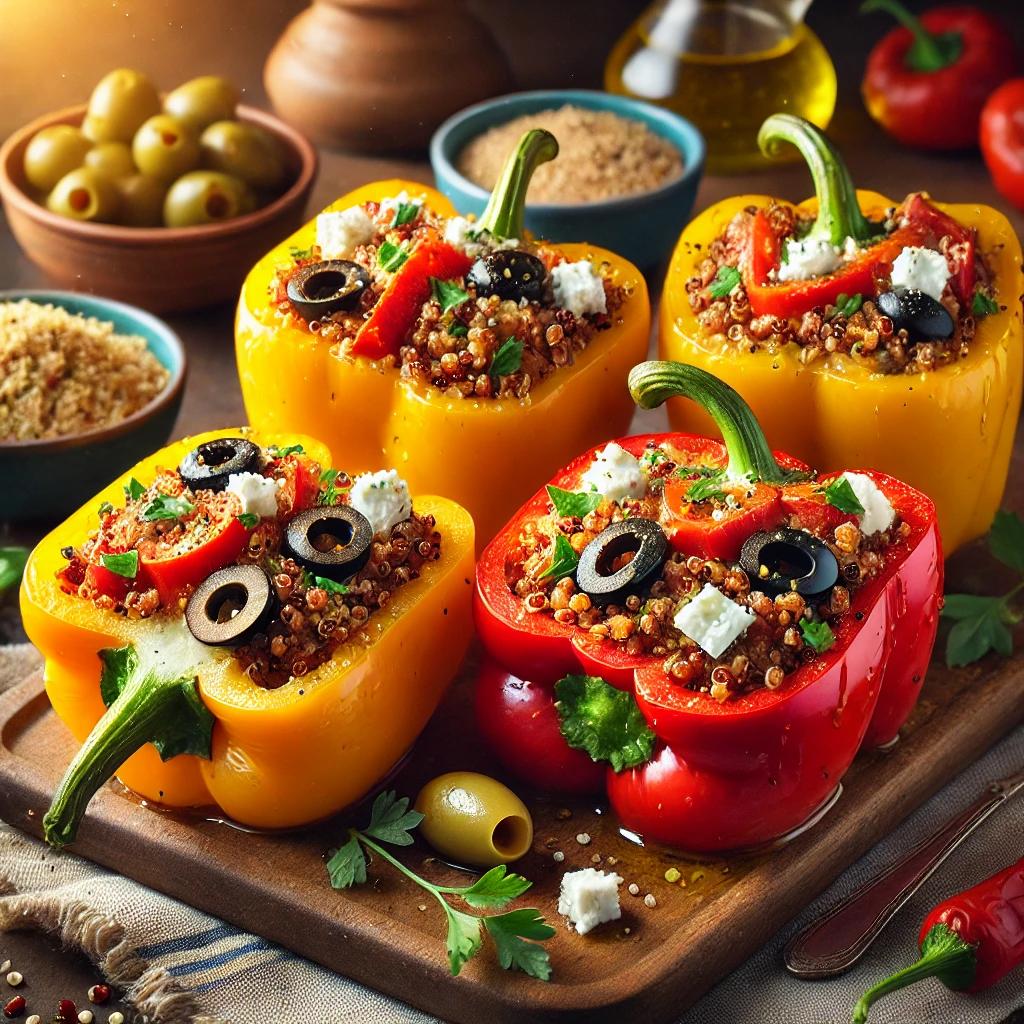
Mediterranean stuffed peppers are a delightful, diabetic-friendly lunch option packed with lean protein, fiber, and healthy fats. The vibrant bell peppers are filled with a savory mixture of ground turkey or chicken, quinoa, feta cheese, and olives, creating a balanced meal that supports blood sugar control and overall health.

Prep Time: 20 minutes
Cook Time: 20 minutes
Portions: 4 servings
Glycemic Index (GI): 30 (Low)
Glycemic Load (GL): 8 (Low)

Ingredients:

  • 4 bell peppers, halved and seeded
  • 1 pound ground turkey or chicken
  • 1 cup cooked quinoa
  • 1/2 cup crumbled feta cheese
  • 1/4 cup chopped olives
  • Cooking spray
  • Salt and pepper, to taste
  • Optional: tzatziki sauce, side Greek salad

Instructions:

  1. Prepare the Quinoa:
    • Cook the quinoa according to the package instructions.
    • Set aside once cooked.
  2. Cook the Meat:
    • Brown the Meat: In a skillet over medium heat, brown the ground turkey or chicken until fully cooked.
    • Season: Season with salt and pepper, then drain any excess fat and set aside.
  3. Make the Filling:
    • Combine Ingredients: In a large mixing bowl, combine the cooked quinoa, browned meat, crumbled feta cheese, and chopped olives.
    • Mix Well: Stir until all ingredients are evenly combined.
  4. Preheat the Air Fryer:
    • Preheat your air fryer to 375°F (190°C).
    • Lightly spray the air fryer basket with cooking spray.
  5. Stuff the Peppers:
    • Fill the Peppers: Place the halved bell peppers in the air fryer basket, cut side up.
    • Add Filling: Generously fill each pepper half with the quinoa and meat mixture, pressing it down slightly to pack it in.
  6. Cook the Stuffed Peppers:
    • Air Fry: Cook the stuffed peppers for 15-20 minutes, or until the peppers are tender and the filling is heated through.
  7. Serve:
    • Optional Garnish: Drizzle with tzatziki sauce for added flavor.
    • Serve with a Side Salad: Pair with a Greek salad made of cucumbers, tomatoes, red onions, and a light vinaigrette for a complete, balanced meal.

Enjoy these beautifully cooked Mediterranean stuffed peppers for a flavorful and balanced lunch that supports your health goals!

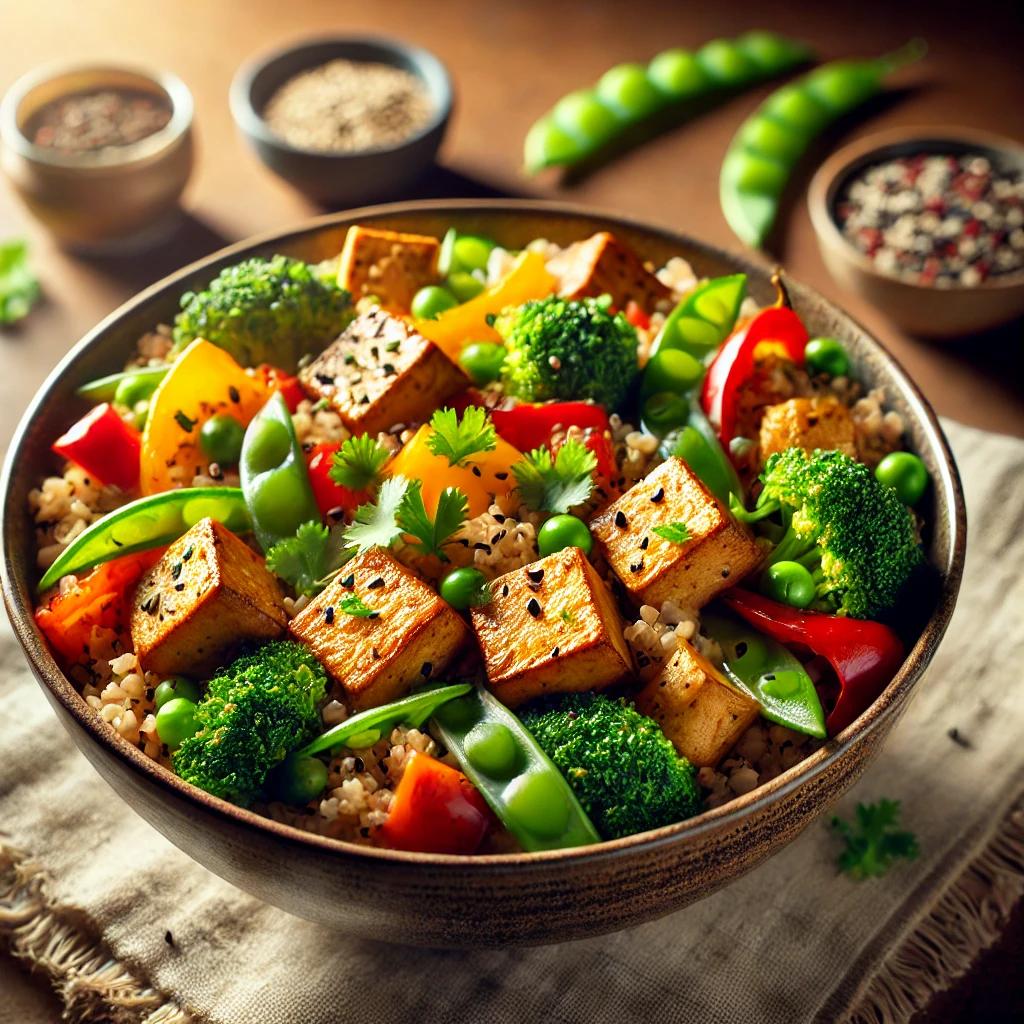
Air-Fried Tofu and Veggie Bowls

Air-Fried Tofu and Veggie Bowls

Air-Fried Tofu and Veggie Bowls

Air-fried tofu and veggie bowls are a delicious and diabetic-friendly meal option. Tofu provides a plant-based protein source that’s high in essential amino acids, while the combination of vibrant vegetables and a hearty grain base ensures you get all the nutrients you need for a balanced lunch.

Prep Time: 15 minutes
Cook Time: 25 minutes
Portions: 2 servings
Glycemic Index (GI): 25 (Low)
Glycemic Load (GL): 8 (Low)

Ingredients:

  • 1 block firm tofu
  • 1 cup mixed vegetables (e.g., broccoli, bell peppers, snap peas)
  • 1 tablespoon olive oil
  • 1 cup cooked brown rice or quinoa
  • Salt and pepper, to taste
  • Low-sodium soy sauce or tamari (for drizzling)
  • Fresh herbs (e.g., cilantro or basil)
  • Optional: lime juice, sesame seeds

Instructions:

  1. Prepare the Tofu:
    • Drain and Press the Tofu: Drain the tofu and press it to remove excess moisture. You can use a tofu press or wrap the tofu in a clean kitchen towel and place a heavy object on top.
    • Cut into Cubes: Once pressed, cut the tofu into bite-sized cubes.
  2. Preheat the Air Fryer:
    • Preheat your air fryer to 375°F (190°C).
  3. Cook the Tofu:
    • Toss with Olive Oil: Lightly coat the tofu cubes with a bit of olive oil to help them crisp up.
    • Air Fry the Tofu: Place the tofu cubes in the air fryer basket in a single layer. Cook for about 15 minutes, shaking the basket halfway through for even cooking. The tofu should be crispy on the outside.
  4. Prepare the Vegetables:
    • Chop the Vegetables: Wash and chop the broccoli, bell peppers, and snap peas into bite-sized pieces.
    • Toss with Olive Oil: In a mixing bowl, toss the vegetables with olive oil, salt, and pepper.
  5. Cook the Vegetables:
    • Air Fry the Vegetables: Once the tofu is done, add the mixed vegetables to the air fryer basket. Cook at 375°F (190°C) for about 10 minutes, shaking occasionally. The vegetables should be tender but still have a slight crunch.
  6. Assemble the Bowls:
    • Add the Base: Start with a base of cooked brown rice or quinoa in each bowl.
    • Top with Tofu and Vegetables: Add the air-fried tofu and vegetables on top.
    • Add Flavor: Drizzle with low-sodium soy sauce or tamari, sprinkle with fresh herbs, and add a squeeze of lime juice or sesame seeds, if desired.

Enjoy these air-fried tofu and veggie bowls for a balanced, delicious, and nutrient-packed lunch that supports your health goals and helps maintain stable blood sugar levels!

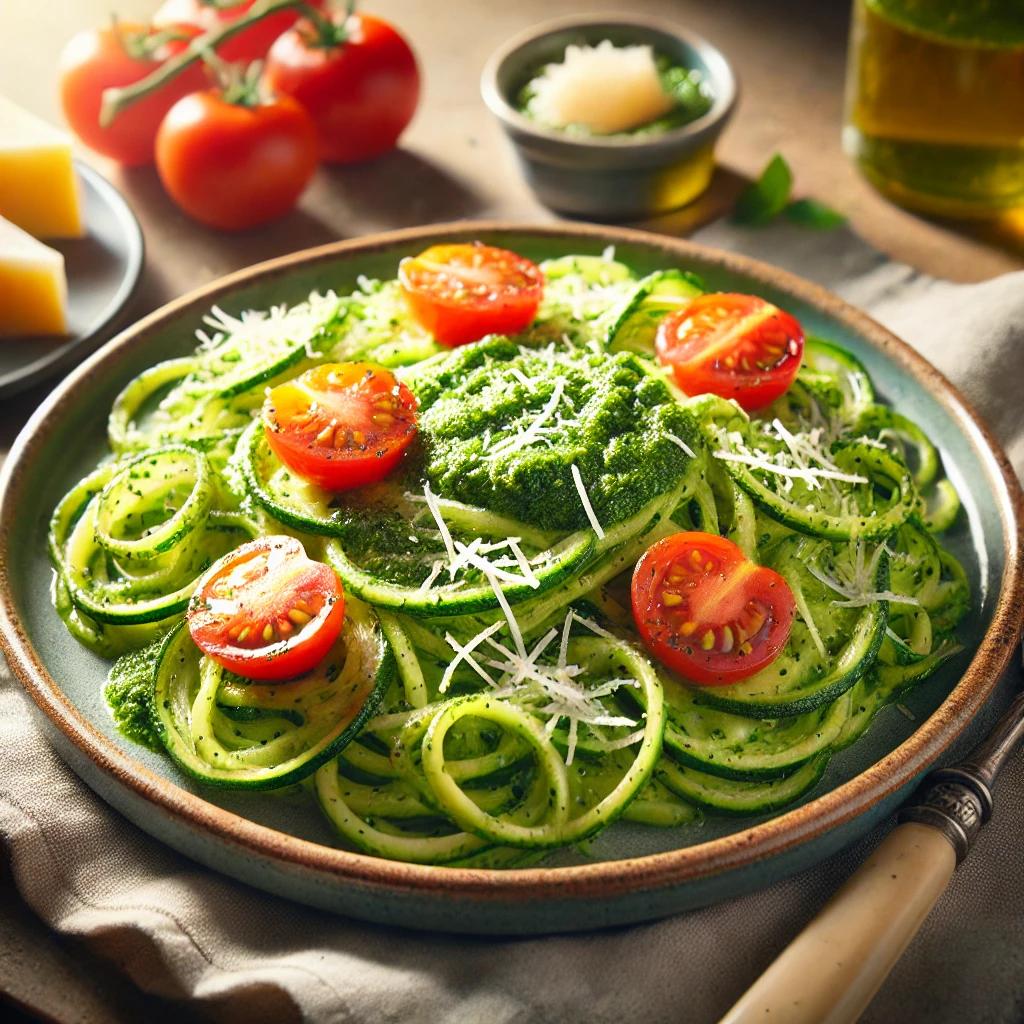
Zucchini Noodles with Pesto

Zucchini Noodles with Pesto (Air Fryer Version)

Zucchini noodles, or “zoodles,” are a great low-carb substitute for traditional pasta, making this dish perfect for managing diabetes. Paired with homemade pesto, these zoodles offer a flavorful, nutritious, and easy-to-make lunch.

Prep Time: 15 minutes
Cook Time: 7 minutes
Portions: 4 servings
Glycemic Index (GI): 15 (Low)
Glycemic Load (GL): 2 (Low)

Ingredients:

  • 4 medium zucchinis
  • 1 cup fresh basil leaves
  • 1/4 cup pine nuts
  • 1/2 cup grated Parmesan cheese
  • 1 clove garlic
  • 1/2 cup olive oil
  • Salt and pepper, to taste
  • Optional: cherry tomatoes, extra Parmesan, grilled chicken or shrimp

Instructions:

  1. Prepare the Zoodles:
    • Spiralize the Zucchini: Use a spiralizer to create zucchini noodles. If you don’t have a spiralizer, use a vegetable peeler to create thin, ribbon-like strips.
    • Set the zucchini noodles aside.
  2. Make the Pesto:
    • Combine Ingredients: In a food processor, combine the basil leaves, pine nuts, grated Parmesan cheese, and garlic.
    • Blend: Pulse until the ingredients are finely chopped.
    • Add Olive Oil: With the processor running, slowly add the olive oil until the mixture is smooth and creamy. Season with salt and pepper to taste.
  3. Cook the Zoodles:
    • Preheat the Air Fryer: Preheat your air fryer to 375°F (190°C).
    • Toss in Olive Oil: Lightly toss the zucchini noodles with a bit of olive oil to prevent sticking.
    • Cook: Place the noodles in the air fryer basket, spreading them out evenly. Cook for 5-7 minutes, shaking the basket halfway through to ensure even cooking. The noodles should be tender but still have a slight crunch.
  4. Assemble the Dish:
    • Combine Zoodles and Pesto: Transfer the cooked zucchini noodles to a large mixing bowl and toss with the homemade pesto until well coated.
    • Add Toppings: Optional – add halved cherry tomatoes for a burst of sweetness and acidity, and sprinkle with extra grated Parmesan cheese.
  5. Optional Protein Addition:
    • Grilled Chicken or Shrimp: Cook the protein in the air fryer (grilled chicken or shrimp) while the noodles are cooking. Toss everything together before serving for a more filling meal.

Enjoy this delicious zucchini noodles with pesto dish as a light, healthy lunch that keeps your carbs in check while delivering rich, vibrant flavors!

Cauliflower Rice Stir-Fry

Cauliflower Rice Stir-Fry (Air Fryer Version)

Cauliflower rice stir-fry is a flavorful, low-carb dish that helps manage blood sugar levels while keeping you full and satisfied. Packed with nutrient-rich vegetables and seasoned with soy sauce, this diabetic-friendly meal is easy to prepare and bursting with flavor.

Prep Time: 15 minutes
Cook Time: 22 minutes
Portions: 4 servings
Glycemic Index (GI): 10 (Low)
Glycemic Load (GL): 2 (Low)

Ingredients:

  • 1 head of cauliflower, riced (or 4 cups pre-riced cauliflower)
  • 1 cup mixed vegetables (carrots, peas, bell peppers)
  • 2 tablespoons low-sodium soy sauce
  • 1 tablespoon olive oil
  • Salt and pepper, to taste
  • Optional: protein source (e.g., shrimp or tofu), sesame seeds, scallions, cilantro

Instructions:

  1. Prepare the Cauliflower Rice:
    • Rice the Cauliflower: Cut the cauliflower into florets and pulse in a food processor until it reaches a rice-like consistency. Alternatively, use a box grater to achieve similar results.
    • Preheat the Air Fryer: Preheat your air fryer to 375°F (190°C).
    • Cook the Cauliflower Rice: Lightly coat the air fryer basket with cooking spray. Spread the riced cauliflower evenly in the basket and cook for about 10 minutes, stirring halfway through. The cauliflower should be tender with a slight crunch.
  2. Prepare the Vegetables:
    • Chop the Vegetables: Chop the carrots, peas, and bell peppers into bite-sized pieces.
    • Toss the Vegetables: In a large mixing bowl, toss the vegetables with olive oil, salt, and pepper.
  3. Cook the Vegetables with the Cauliflower Rice:
    • Combine in the Air Fryer: Once the cauliflower rice is done, add the mixed vegetables to the air fryer basket.
    • Cook Together: Cook for an additional 10-12 minutes, stirring occasionally, until the vegetables are tender and slightly charred.
  4. Add Protein (Optional):
    • Shrimp: Toss shrimp with olive oil, salt, and pepper. Air fry at 400°F (200°C) for 5-7 minutes.
    • Tofu: Cut tofu into cubes, marinate with soy sauce and sesame oil, and air fry at 375°F (190°C) for about 10 minutes, shaking the basket halfway through.
  5. Season and Garnish:
    • Mix in Soy Sauce: Once the vegetables are done, stir in the low-sodium soy sauce.
    • Garnish: Garnish with sesame seeds, chopped scallions, or cilantro for added flavor and freshness.

Serve hot for a balanced, healthy meal that’s low in carbs and packed with nutrients. This cauliflower rice stir-fry makes a perfect lunch or dinner option for managing diabetes while enjoying a delicious and satisfying dish.

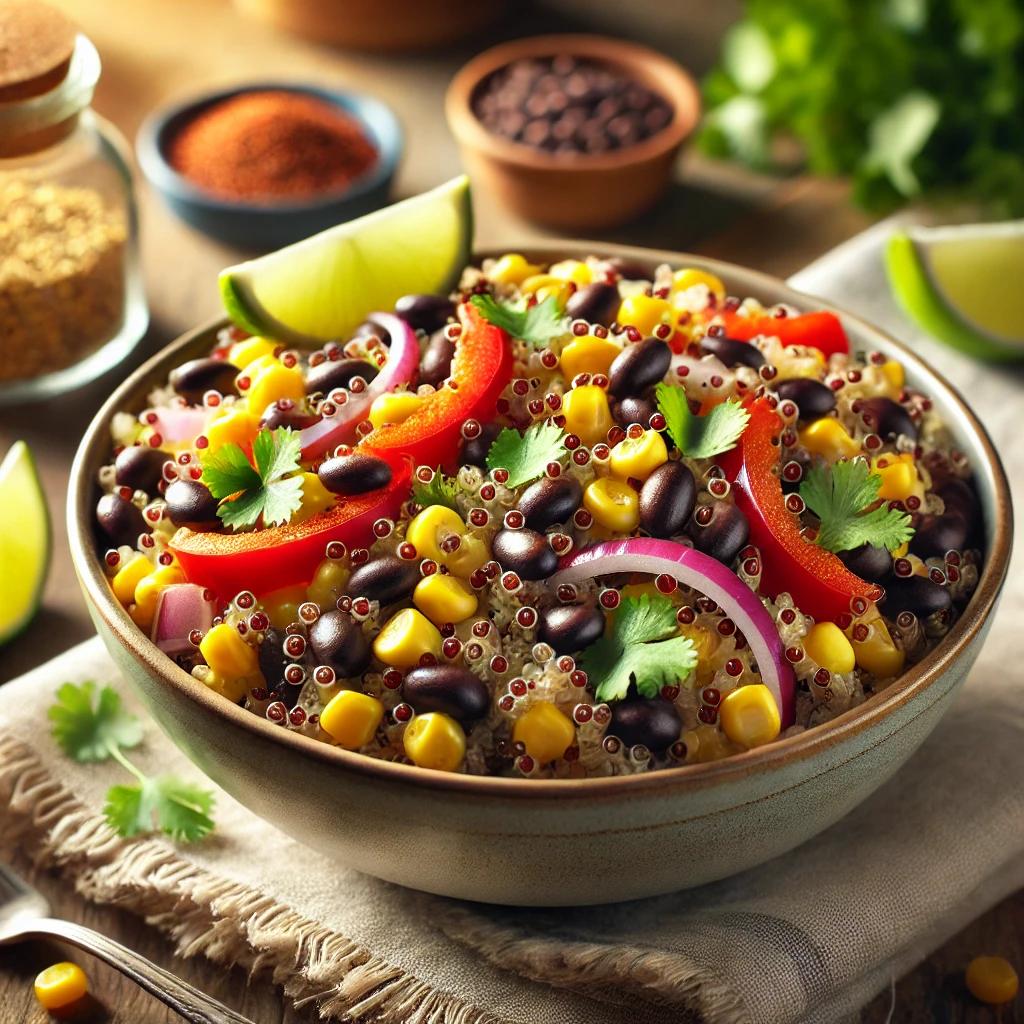
Quinoa and Black Bean Salad

Quinoa and Black Bean Salad

Quinoa and black beans create a satisfying, diabetic-friendly salad packed with protein, fiber, and nutrients. This vibrant and flavorful dish is perfect for maintaining stable blood sugar levels while keeping you full and energized throughout the day.

Prep Time: 15 minutes
Cook Time: 15 minutes
Portions: 4 servings
Glycemic Index (GI): 53 (Medium)
Glycemic Load (GL): 15 (Medium)

Ingredients:

  • 1 cup cooked quinoa
  • 1 can black beans (drained and rinsed)
  • 1 red bell pepper, chopped
  • 1/2 red onion, finely chopped
  • 1 cup corn (fresh or frozen)
  • Handful of fresh cilantro, chopped
  • Juice of 2 limes
  • 1 tablespoon olive oil
  • Salt and pepper, to taste
  • Optional: 1 diced jalapeño for spice, 1 diced avocado for creaminess

Instructions:

  1. Cook the Quinoa:
    • Cook the quinoa according to the package instructions.
    • Once cooked, let it cool to room temperature.
  2. Prepare the Vegetables:
    • Chop the red bell pepper and finely chop the red onion.
    • If using frozen corn, thaw it before using.
  3. Mix the Salad:
    • In a large mixing bowl, combine the cooled quinoa, black beans, chopped bell pepper, red onion, and corn.
    • Add the chopped cilantro and stir until everything is well combined.
  4. Make the Dressing:
    • In a small bowl, mix the lime juice and olive oil.
    • Pour the dressing over the salad and toss to coat evenly.
    • Season with salt and pepper to taste.
  5. Optional Additions:
    • If desired, add a diced jalapeño for a spicy kick.
    • Include diced avocado for added creaminess and healthy fats.
  6. Serve or Store:
    • Serve immediately or store in an airtight container in the refrigerator for up to five days.
    • If storing for meal prep, consider keeping the dressing separate and adding it just before eating to maintain the freshness of the ingredients.

Enjoy this quinoa and black bean salad as a healthy, balanced meal that supports diabetes management while providing a burst of flavor and nutrients!

Air-Fried Salmon with Lemon-Dill Sauce

Air-Fried Salmon with Lemon-Dill Sauce

Air-fried salmon with lemon-dill sauce is a delicious and diabetic-friendly meal packed with omega-3 fatty acids, which help reduce inflammation and improve overall health. The air fryer makes cooking the salmon quick and easy, with minimal oil needed.

Prep Time: 10 minutes
Cook Time: 12 minutes
Portions: 4 servings
Glycemic Index (GI): 0 (Low)
Glycemic Load (GL): 0 (Low)

Ingredients:

  • 4 salmon fillets
  • Juice of 1 lemon
  • 2 tablespoons fresh dill, chopped
  • 1/2 cup Greek yogurt
  • Salt and pepper, to taste
  • Cooking spray

Instructions:

  1. Marinate the Salmon:
    • In a bowl, marinate the salmon fillets with lemon juice, salt, and pepper.
    • Let the salmon sit for about 10 minutes to absorb the flavors.
  2. Prepare the Lemon-Dill Sauce:
    • In a small bowl, mix together the Greek yogurt, chopped dill, and a squeeze of lemon juice.
    • Stir until smooth and creamy. Set aside.
  3. Preheat the Air Fryer:
    • Preheat your air fryer to 400°F (200°C).
    • Lightly spray the air fryer basket with cooking spray to prevent sticking.
  4. Cook the Salmon:
    • Place the marinated salmon fillets in the air fryer basket, making sure they are not touching each other for even cooking.
    • Cook for 10-12 minutes, or until the salmon is cooked through and reaches an internal temperature of 145°F (63°C).
  5. Serve:
    • Serve the air-fried salmon with the prepared lemon-dill sauce drizzled on top or on the side.
    • Pair with steamed vegetables such as broccoli, asparagus, or green beans, and a portion of quinoa for a complete, balanced meal.

Enjoy the rich, buttery salmon with a zesty lemon-dill sauce for a lunch that not only tastes amazing but also supports your health, providing essential nutrients to help manage diabetes effectively!

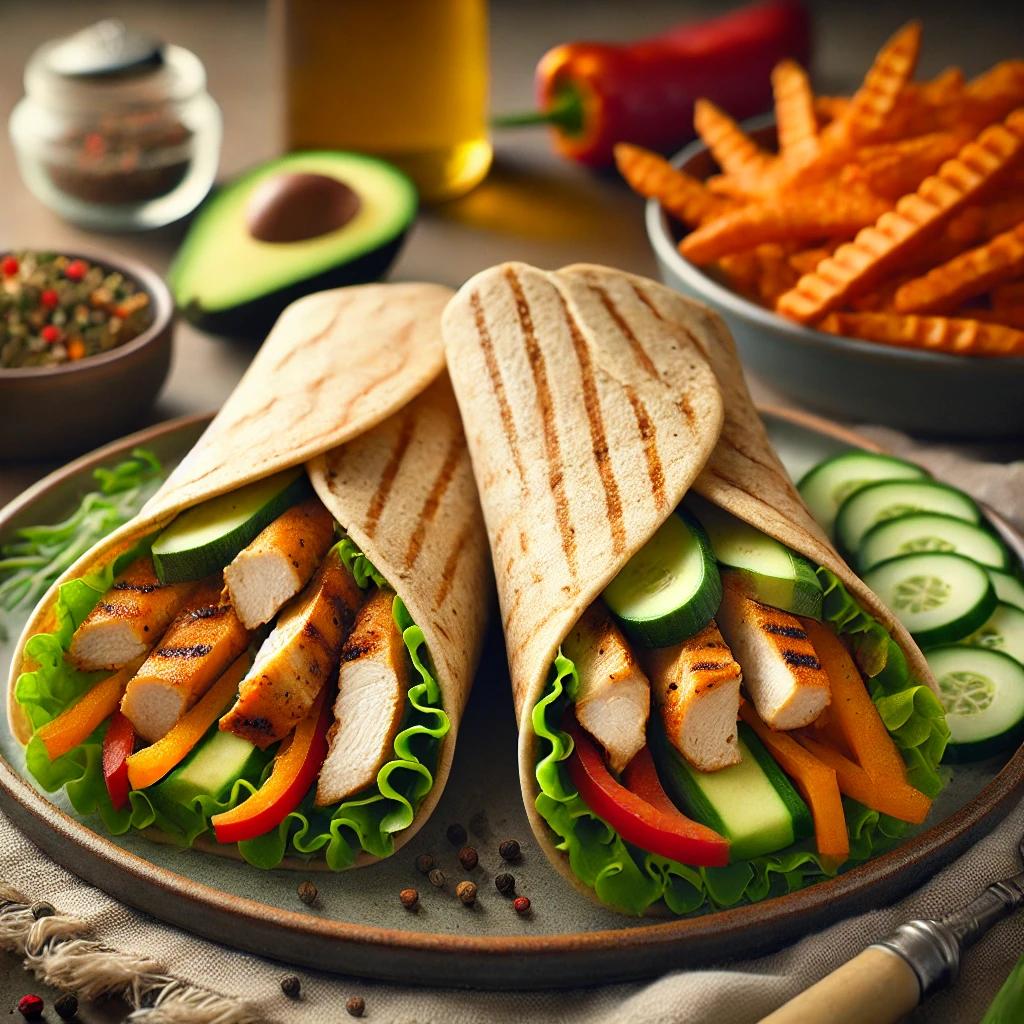
Chicken and Veggie Wraps

Chicken and Veggie Wraps (Air Fryer Version)

Chicken and veggie wraps are a perfect choice for a healthy, diabetic-friendly lunch. Lean protein from the chicken keeps you full and helps control blood sugar, while fresh veggies add essential nutrients and fiber. Wrapped in whole-wheat tortillas, this balanced meal is both nutritious and delicious.

Prep Time: 15 minutes
Cook Time: 15 minutes
Portions: 4 wraps
Glycemic Index (GI): 40 (Low)
Glycemic Load (GL): 7 per wrap (Low)

Ingredients:

  • 2 grilled chicken breasts
  • 1 cup shredded lettuce
  • 1 bell pepper, thinly sliced
  • 1 cucumber, thinly sliced
  • 4 whole-wheat tortillas
  • 1 ripe avocado, sliced (optional)
  • Low-fat yogurt dressing (optional)
  • Cooking spray or olive oil

Instructions:

  1. Prepare the Chicken:
    • Preheat your air fryer to 375°F (190°C).
    • Lightly spray the air fryer basket with cooking spray.
    • Place the chicken breasts in the basket and cook for about 15 minutes, flipping halfway through. The internal temperature should reach 165°F (74°C).
    • Once done, let the chicken rest for a few minutes, then slice it into thin strips.
  2. Assemble the Wraps:
    • Lay out each whole-wheat tortilla and place a handful of shredded lettuce in the center.
    • Add a few strips of grilled chicken, followed by thin slices of bell pepper and cucumber.
    • Optional: Add avocado slices for healthy fats and creaminess.
    • Drizzle with a bit of low-fat yogurt dressing for added moisture and tang.
  3. Roll the Wraps:
    • Roll each tortilla tightly, folding in the sides to secure the fillings.
  4. Customize Your Wraps:
    • For extra spice, add sliced jalapeños or a dash of hot sauce.
    • For a Mediterranean twist, include crumbled feta cheese and a sprinkle of oregano.
    • You can swap the bell pepper for shredded carrots or cherry tomatoes for variety.

Serving Suggestion:

  • Serve the wraps with a side of air-fried sweet potato fries or a small salad for a complete, balanced meal.

Enjoy these chicken and veggie wraps for a satisfying, nutritious lunch that supports your health goals while keeping you full and energized!

Sweet Potato Hash Browns

Sweet Potato Hash Browns

Sweet potato hash browns are a great alternative to traditional hash browns, especially for those managing diabetes. They have a lower glycemic index and are packed with vitamins, fiber, and essential nutrients. Cooking them in the air fryer allows you to achieve a crispy texture without excessive oil.

Prep Time: 15 minutes
Cook Time: 25 minutes
Portions: 4 servings
Glycemic Index (GI): 50 (Medium)
Glycemic Load (GL): 14 (Medium)

Ingredients:

  • 2 large sweet potatoes, peeled and grated
  • 1 small onion, finely chopped
  • 1 bell pepper, finely chopped
  • 1 teaspoon paprika
  • 1 teaspoon garlic powder
  • Cooking spray

Instructions:

  1. Prepare the Sweet Potatoes:
    • Peel and grate the sweet potatoes using a box grater.
    • Place the grated sweet potatoes in a bowl of cold water and let them soak for 5 minutes. This step removes excess starch to help them crisp up better.
    • Drain the sweet potatoes and pat them dry with a clean kitchen towel.
  2. Mix the Ingredients:
    • In a large mixing bowl, combine the grated sweet potatoes, chopped onion, and chopped bell pepper.
    • Add the paprika and garlic powder, mixing well until the spices are evenly distributed.
  3. Preheat the Air Fryer:
    • Preheat your air fryer to 375°F (190°C).
    • Lightly spray the air fryer basket with cooking spray to prevent sticking.
  4. Cook the Hash Browns:
    • Form the sweet potato mixture into small patties or spread it out evenly in the air fryer basket. Make sure not to overcrowd the basket for better air circulation.
    • Cook for 10 minutes, then use a spatula to flip the hash browns.
    • Cook for an additional 10-15 minutes, or until the hash browns are golden brown and crispy.
  5. Serve:
    • Serve the sweet potato hash browns warm, paired with scrambled eggs or turkey sausage for a balanced meal.
    • Add a side of fresh fruit, such as berries or a sliced apple, for a refreshing contrast and extra fiber.

Enjoy these delicious, diabetic-friendly sweet potato hash browns as part of a nutritious breakfast that keeps you full and supports stable blood sugar levels!