Pancakes with Almond Flour

These almond flour pancakes are a great option for those managing diabetes. Made with low-glycemic almond flour, they provide a balanced combination of protein, healthy fats, and fiber, making them an excellent way to start the day without spiking blood sugar levels. Cooked in the air fryer, they come out fluffy with a lovely golden exterior.

Prep Time: 10 minutes
Cook Time: 14 minutes (7 minutes per side)
Portions: 4 servings
Glycemic Index (GI): 20 (Low)
Glycemic Load (GL): 3 (Low)

Ingredients:

  • 1 cup almond flour
  • 1 teaspoon baking powder
  • 2 large eggs
  • 1/2 cup unsweetened almond milk
  • 1 teaspoon vanilla extract
  • Cooking spray or olive oil (for greasing)

Instructions:

  1. Mix Dry Ingredients:
    • In a mixing bowl, whisk together the almond flour and baking powder until well combined.
  2. Prepare Wet Ingredients:
    • In a separate bowl, beat the eggs until frothy.
    • Add the unsweetened almond milk and vanilla extract, and mix well.
  3. Combine Ingredients:
    • Gradually add the wet mixture to the dry ingredients, stirring until smooth. The batter should be slightly thick but pourable. If it’s too thick, add a little more almond milk until the desired consistency is achieved.
  4. Preheat the Air Fryer:
    • Preheat your air fryer to 350°F (175°C).
    • Lightly grease the air fryer basket with cooking spray or a brush of oil to prevent sticking.
  5. Cook the Pancakes:
    • Pour the batter into small silicone molds or onto parchment paper cut to fit the air fryer basket.
    • Place the molds or parchment paper in the air fryer.
    • Cook for 5-7 minutes on each side, flipping halfway through, until the pancakes are golden brown and cooked through.
  6. Serve with Toppings:
    • Serve the pancakes with diabetic-friendly toppings such as:
      • Fresh berries (e.g., blueberries, strawberries, raspberries)
      • A drizzle of sugar-free syrup
      • Chopped nuts (e.g., almonds, walnuts)
      • Optional: a dash of cinnamon or nutmeg for extra flavor

Enjoy these almond flour pancakes with your favorite toppings for a balanced, delicious, and diabetes-friendly breakfast! You can also make extra pancakes and store them in the refrigerator or freezer for quick breakfasts during the week. Just reheat in the air fryer and enjoy.

Air-Fried Avocado Toast

Avocado toast is a popular, nutritious breakfast option, especially for those managing diabetes. The healthy fats and fiber from the avocado, paired with whole-grain bread, provide a satisfying, balanced meal that helps maintain stable blood sugar levels and keeps you energized throughout the day.

Prep Time: 5 minutes
Cook Time: 5 minutes
Portions: 2 servings
Glycemic Index (GI): 45 (Low)
Glycemic Load (GL): 8 (Low)

Ingredients:

  • 2 slices whole-grain bread
  • 1 ripe avocado
  • 1 teaspoon lime juice
  • Salt and pepper, to taste
  • Optional toppings: halved cherry tomatoes, sliced radishes, cucumber slices, microgreens, feta cheese

Instructions:

  1. Prepare the Avocado Spread:
    • Cut the ripe avocado in half, remove the pit, and scoop the flesh into a bowl.
    • Mash the avocado with a fork until it reaches your desired consistency.
    • Add lime juice to the mashed avocado to prevent browning and add a tangy flavor.
    • Season with a pinch of salt and pepper to taste.
  2. Air-Fry the Bread:
    • Preheat your air fryer to 350°F (175°C).
    • Arrange the whole-grain bread slices in the air fryer basket in a single layer, making sure they do not overlap.
    • Toast the bread for 3-5 minutes, checking occasionally to ensure it reaches your desired level of crispiness.
  3. Assemble the Avocado Toast:
    • Once the bread is toasted to perfection, spread a generous layer of mashed avocado on each slice.
    • Add your favorite toppings to elevate the flavor:
      • Cherry tomatoes for sweetness
      • Radish slices for a peppery crunch
      • Cucumber slices or microgreens for added freshness
      • Feta cheese for a tangy, creamy touch
  4. Serve and Enjoy:
    • Serve the avocado toast immediately for the best texture, enjoying the creamy avocado paired with the crispy, air-fried bread and your choice of flavorful toppings.

Enjoy this simple yet delicious air-fried avocado toast for a breakfast that feels indulgent but supports your health goals, keeping your blood sugar stable and energy levels high!

Air Fryer Veggie Omelets

Veggie omelets are a wonderful way to kickstart your day, particularly when managing diabetes. Packed with fiber-rich vegetables, this dish helps maintain stable blood sugar levels while providing essential vitamins and minerals. Cooking the omelet in an air fryer keeps it light and simple without compromising on taste.

Prep Time: 10 minutes
Cook Time: 12 minutes
Portions: 4 servings
Glycemic Index (GI): 25 (Low)
Glycemic Load (GL): 3 (Low)

Ingredients:

  • 4 large eggs
  • 1/2 cup chopped tomatoes
  • 1/2 cup diced mushrooms
  • 1 cup fresh spinach leaves
  • 1 tablespoon olive oil
  • Fresh parsley or cilantro, chopped (for garnish)
  • 1/4 cup low-fat cheese (optional, such as feta or mozzarella)
  • Salt and pepper to taste

Instructions:

  1. Prepare the Vegetables:
    • Wash the tomatoes, mushrooms, and spinach thoroughly.
    • Chop the tomatoes into bite-sized pieces, dice the mushrooms, and leave the spinach leaves whole or roughly chop them.
  2. Prepare the Omelet Mix:
    • In a medium-sized bowl, beat the eggs with a pinch of salt and pepper.
    • Lightly grease silicone molds with olive oil to prevent sticking.
  3. Assemble the Omelets:
    • Pour the beaten eggs into the silicone molds, filling them halfway.
    • Add the prepared tomatoes, mushrooms, and spinach evenly across all molds.
  4. Cook in the Air Fryer:
    • Preheat the air fryer to 350°F (175°C).
    • Place the silicone molds in the air fryer basket, ensuring they do not touch each other.
    • Cook for 10-12 minutes, checking halfway through. The omelet should be firm and fully set once done.
  5. Enhance the Flavor:
    • Remove the molds from the air fryer and let the omelets cool for a minute before taking them out.
    • Garnish with chopped parsley or cilantro.
    • Optionally, sprinkle with low-fat cheese for added creaminess.
  6. Serve:
    • Serve the veggie omelets warm with a side of fresh fruit or a slice of whole-grain toast.
    • For those who enjoy some heat, add a dash of hot sauce or sprinkle with chili flakes.

Enjoy these delicious, healthy veggie omelets as part of your morning routine—a great way to manage diabetes while enjoying a flavorful, satisfying meal!

Low-Carb Breakfast Burritos (Air Fryer Version)

Diabetic Air Fryer Cookbook

Low-carb breakfast burritos are a perfect choice for people managing diabetes, offering a balance of protein, healthy fats, and minimal carbs. Using low-carb tortillas made from whole grains or alternative flours like almond or coconut ensures a lower glycemic impact compared to traditional tortillas. These burritos are packed with protein from eggs and healthy fats from avocado, helping you stay full longer and avoid unhealthy snacking.

Prep Time: 10 minutes
Cook Time: 15 minutes
Portions: 6 servings
Glycemic Index (GI): 25 (Low)
Glycemic Load (GL): 6 (Low)

Ingredients:

  • 6 large eggs
  • A handful of fresh spinach
  • 1/2 yellow bell pepper, diced
  • 1/2 onion, diced
  • 1 ripe avocado, sliced
  • 6 low-carb tortillas
  • Salt and pepper to taste
  • Optional: shredded cheese, salsa, Greek yogurt

Instructions:

  1. Prepare the eggs:
    • In a bowl, whisk the eggs with a pinch of salt and pepper.
    • Heat a non-stick pan over medium heat and scramble the eggs until just set. Remove from heat and set aside.
  2. Cook the vegetables:
    • In a separate pan, sauté the diced bell pepper and onion over medium heat until soft and caramelized (about 5 minutes). Add the spinach and cook for an additional 1-2 minutes until wilted. Set aside.
  3. Assemble the burritos:
    • Lay out each low-carb tortilla and place a portion of scrambled eggs in the center.
    • Add sautéed vegetables (bell pepper, onion, and spinach) and a few slices of avocado.
    • Optionally, sprinkle some shredded cheese on top.
    • Roll the tortilla tightly, folding in the sides to keep the fillings secure.
  4. Air fry the burritos:
    • Preheat your air fryer to 375°F (190°C).
    • Place the assembled burritos in the air fryer basket, ensuring they don’t touch to allow even cooking.
    • Air fry for 5-7 minutes or until the tortillas are golden brown and crispy.
  5. Serve:
    • Serve the burritos with a side of salsa and a dollop of Greek yogurt for a refreshing contrast.
    • Optionally, pair with fresh fruit such as berries or sliced apples to add natural sweetness and fiber.

Enjoy these delicious, healthy burritos that are perfect for keeping your blood sugar stable while offering a satisfying and tasty breakfast!

5 Tips for Amazon FBA Holiday Guide

The holidays are probably the last thing you want to think about right now. But, it will be here before you know it. The more prepared you are for it, the better your ecommerce business will perform during the critical holiday season.

For most ecommerce retailers, the holiday season is the busiest time of the year. Selling on Amazon can get downright crazy, even when it’s not your first go around. There is a lot of advice out there about how much inventory to have on hand for the holidays and more. The focus of this post is to remind you of the items that are often overlooked during the busyness of the season – items you can start thinking about now, while the weather is still warm.


1. Check your product listings.

August and September are great months to check the information on your Amazon listings for accuracy, before the mad dash to the end of the year. It’s a good idea to keep an eye on your listings throughout the holiday season. Check them once a week, if possible, during October through December. There are a couple of Amazon reports that can help:


Listings Quality and Suppressed Listings Report.

This report will tell you if there are any data omissions or errors on your listings. While many errors on this report are not critical, it is still worth checking to make sure you have the best product data available to your customers.


Category Listing Report.

Most Amazon sellers don’t look at this report because it has to be “turned on” for your viewing by Amazon seller support. But the information that is contained in the report is worth you contacting seller support to see it. The report details all of the data you have entered in your listings, including tax collection codes. It allows you to see every detail so you can adjust or correct as needed.


2. Manage your FBA inventory levels.

This tip is especially important for sellers who are planning to use Fulfillment By Amazon (FBA) for the first time. Amazon usually stops accepting new FBA sellers in mid-October. So, if you are planning to use Amazon FBA as your fulfillment option this holiday season, send your first shipment of merchandise to Amazon before the second week of October.

They also have deadlines for inventory for certain categories before Black Friday and Christmas for current FBA sellers. Keep your eye out for Amazon’s deadline announcement and plan your purchase orders accordingly.

Late September or early October is a good time to make sure that you have a plan in place for inventory replenishment. If you use an amazon inventory management solution to run your business, you should check your inventory alerts and forecasting reports to accurately estimate inventory needs.

If you don’t have a software solution, you can use Amazon’s “Set Replenishment Alerts” option in the Inventory section. Adjusting these settings before the holiday rush will save you a lot of time and help prevent overselling.

Related: Is Amazon FBA Right for your Business?


3. Clear out stale inventory.

If you have slow-moving stock taking up room on the shelves at Amazon, clearing it out before Black Friday will give you more room to stock your best-sellers during the holiday season. Now is the time to cut prices, bundle old inventory with top-sellers, or decide to remove your slow-movers from your FBA inventory. That way, by mid-October, you will have plenty of room for your quick-moving products.

Related: Tips to Avoid Paying Amazon FBA Long-term Storage Fees


4. Adjust your pricing.

Not only should you reduce prices on your slow-moving items, but you should also review your pricing strategy. Amazon has strict rules about price gauging, and the enforcement of those rules tend to kick into high gear during the holiday season. If Amazon catches you charging more than 10% to 15% over the stated list price, they may prevent you from capitalizing on the Featured Merchant status for those products – even if you are using FBA.


5. Prepare for returns.

The unpredictability of customer demand may leave you with extra inventory after the holidays. When you are ordering more inventory throughout the holidays, make sure you review the suppliers’ return policies. Hopefully, you won’t need to return any, but it’s better to be prepared if you do.

It’s tempting to take it easy during these hot summer months. But, if you take the time to get ready for the holiday season early, you will be prepared for a successful Black Friday.

How to Sell on Amazon for Beginners Using FBA: A Step by Step Guide

How to Sell on Amazon for Beginners Using FBA: A Step by Step Guide

So you want to sell on Amazon, but don’t know where to start. I’ve been there. I had a few old video games that I wanted to get rid of, and I thought Amazon was the perfect place to sell them.

To help others who want to start selling on Amazon, I’ve documented step-by-step the process I took to sell my first items through Amazon FBA.

In sticking to simplicity I’m calling this guide, “How to Sell on Amazon for Beginners Using FBA: A Step-by-Step Guide”. While this guide is tailored to selling using FBA, you can sell and ship the items yourself. However, I found the convenience factor of FBA too great to overlook.

What is Amazon FBA and why should I use it?

Amazon is famous for their free 2-day shipping through Amazon Prime. It’s one of the main reasons people shop on the marketplace. Free 2-day shipping is now the standard for all online sellers.

Wouldn’t it be great if you could offer free 2-day shipping on the items you sell? Good news, you can!

That’s the reason you use Amazon FBA. With Amazon FBA, you simply ship your items to an Amazon warehouse and they take care of the rest for you. So, if you ship them one box with 25 items you want to sell, Amazon will pick, pack and ship each of those items for you as they are sold.

For many, Amazon FBA is a smart and cost-effective way to ship your items. While you pay a fee for this service, you’re providing customers industry-leading logistics to ensure their package arrives on-time.

How to Sell on Amazon for Beginners Using FBA (Fulfillment by Amazon)

In this guide, I’ll take you through the entire process of selling on Amazon. Not only that, I’m going to show you how I took these same exact steps to sell my first few items using Fulfillment by Amazon.

Step 1: How to Create an Amazon Seller Account

First, you need to create an Amazon Seller account if you don’t already have one. You can create one on this page here.

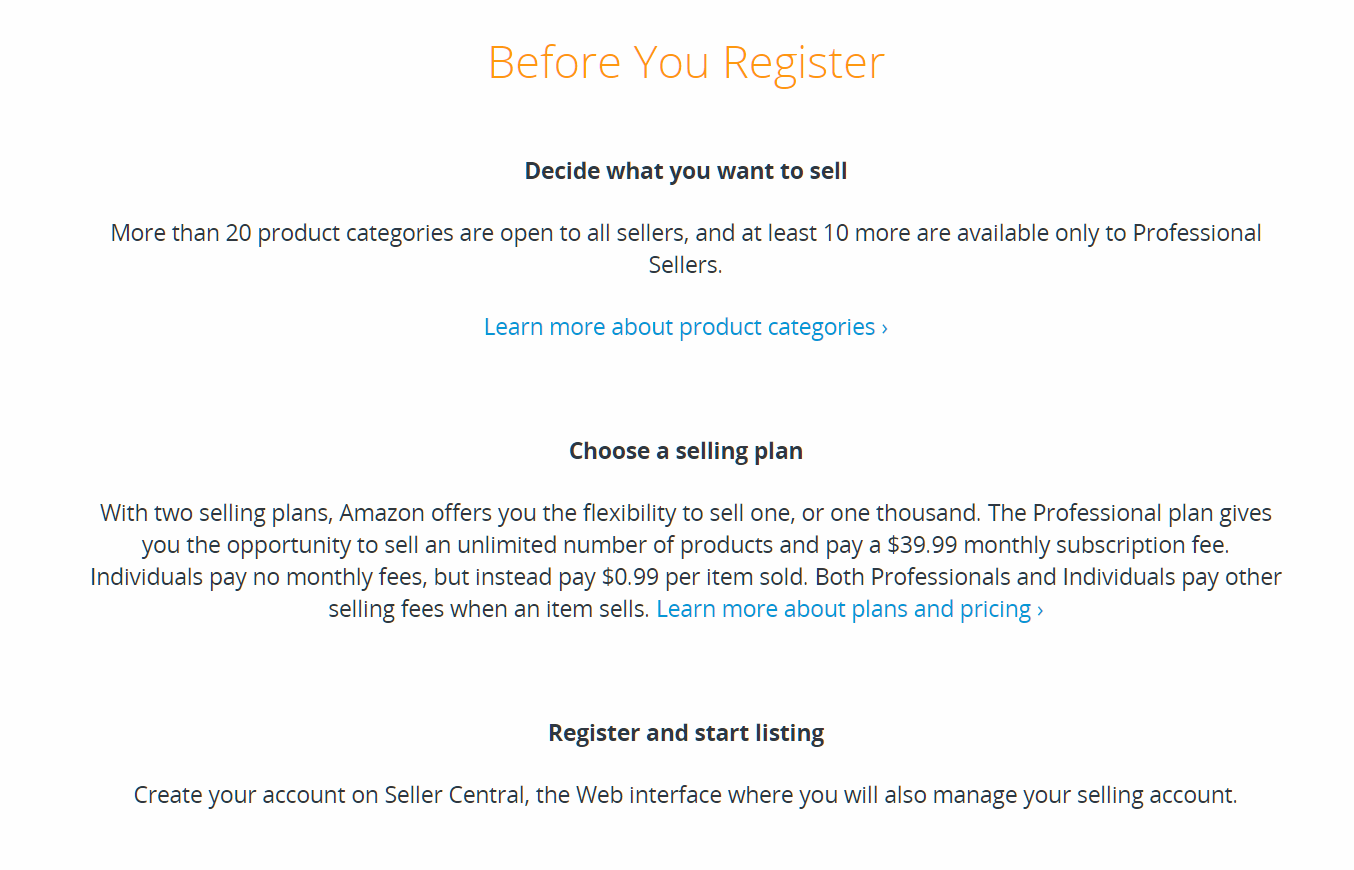
Be sure to read the “Before Your Register” section on the webpage. It provides info about the two types of Amazon Seller accounts, Professional and Individual.

Don’t know which account type to use? The answer is simple: if you’re going to sell more than 40 items a month, use a Professional account; otherwise, select an Individual account.

Amazon Seller Account

Be sure to read the “Before You Register” content to understand what type of Amazon selling plan you want to create.


Why is 40 items the cut off point? Amazon will charge you $0.99 per item when selling on an Individual account. So, if you’re going to sell 40 items a month, you might as well pay for the $40 a month Professional account.

In my case, I was only selling a few items, so I chose an Individual account.

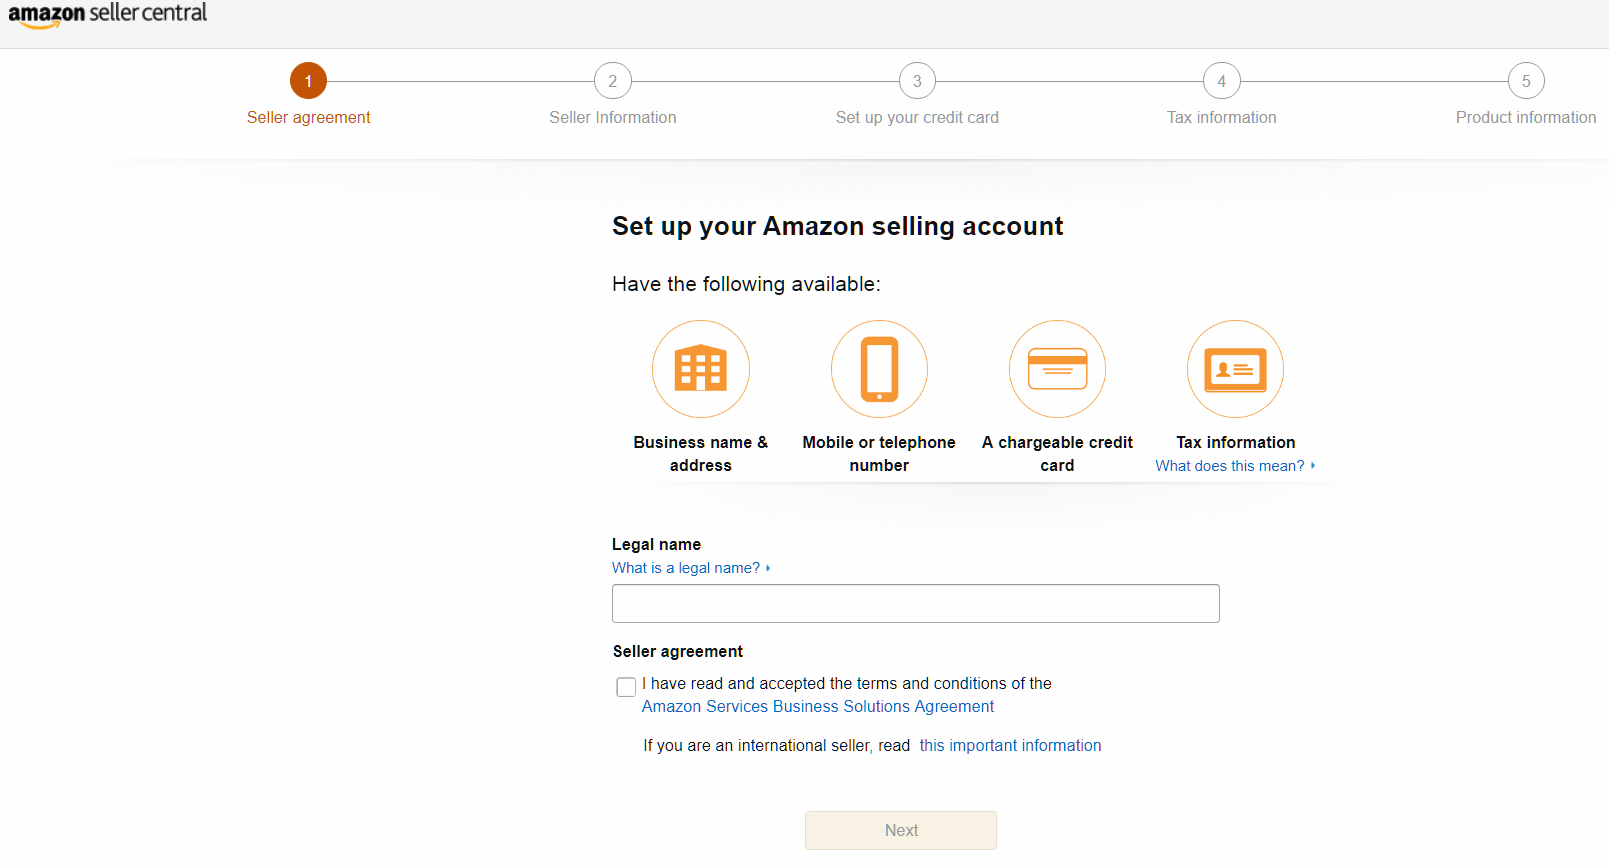
Once you choose your account type, you’ll be asked to login or create an Amazon account using your preferred email. From then on you will need to provide:

  1. Business Name and Address
  2. Agree to Seller agreement
  3. Mobile or Telephone Number
  4. Billing Method/Deposit – Chargeable Credit Card for Professional Account
  5. Tax information – If signing up for Professional Account

Amazon Seller Account Step by Step

These are the steps you must take to create a Amazon Seller account.


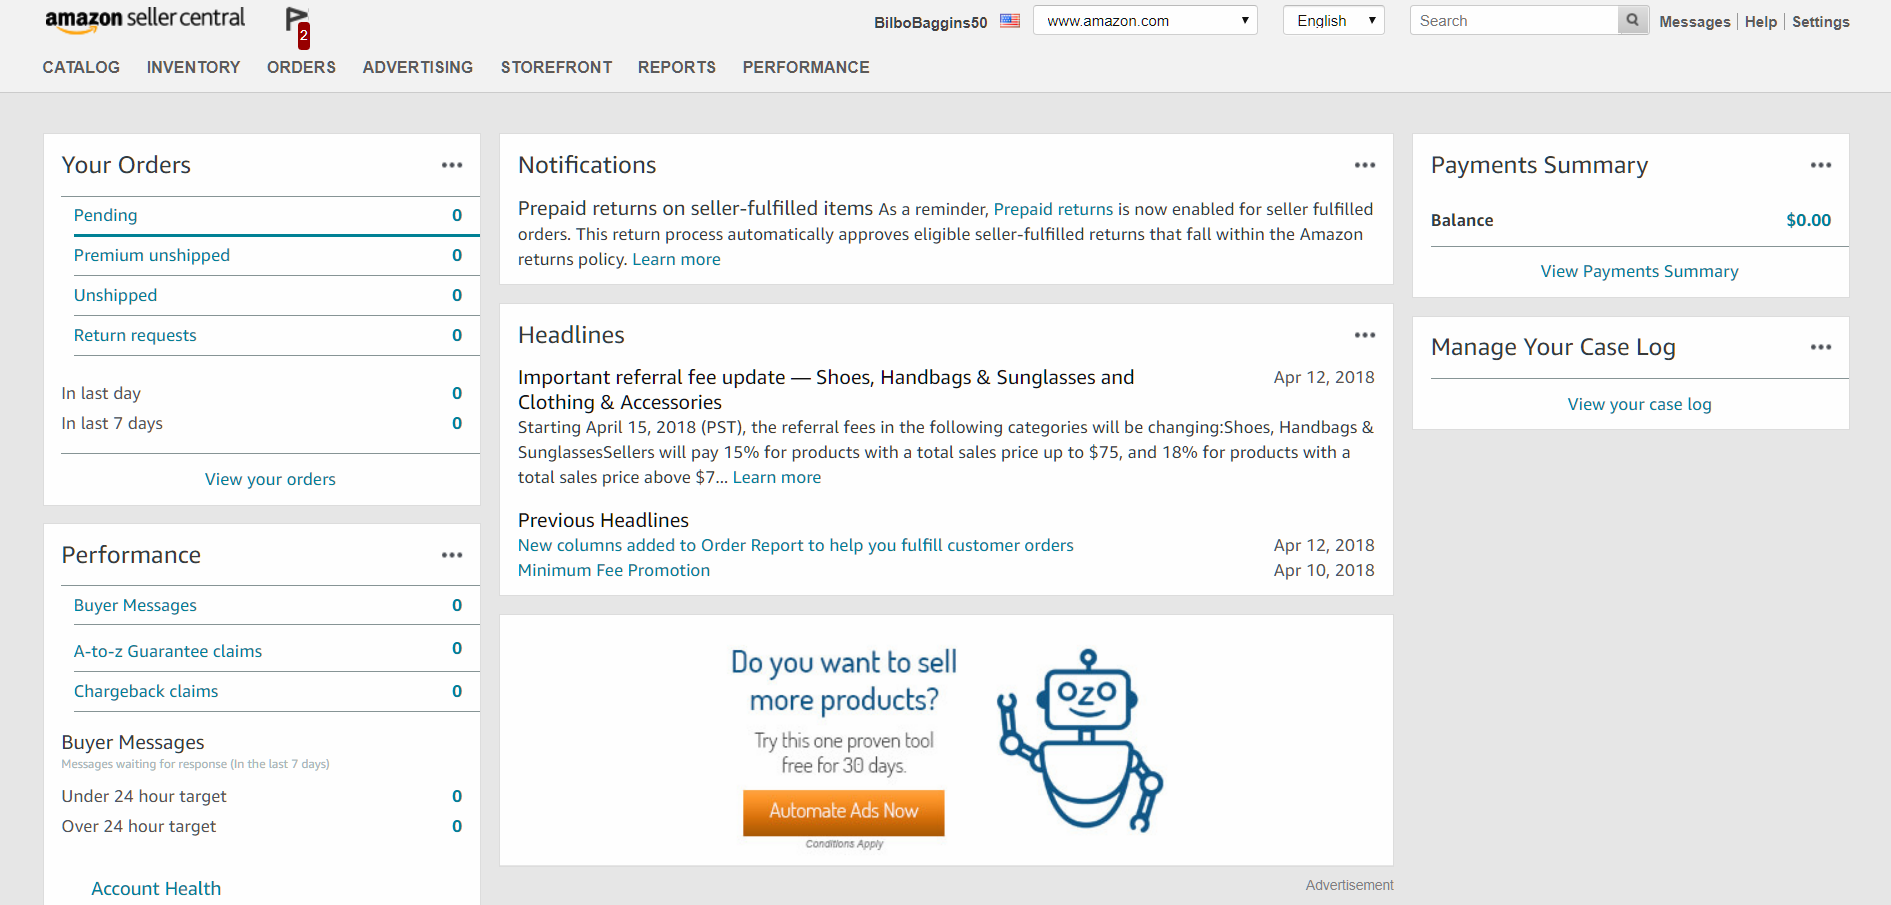
For your seller information, you’ll need to provide your name and address, as well as a “Display name”. This will be the name buyers see next to the item you’re selling. It can be anything you want, but remember it’s public. I chose “BilboBaggins50” because I was selling some old Lord of the Rings video games.

Next, you must verify your identity through a phone call or text message.

Lastly, enter your credit card and bank information for deposits. You’ll need access to your 9-digit routing and bank account number.

Your account is now created! Now, you should be greeted with a home screen that looks fairly empty.

amazon seller account homepage

This is my very empty Amazon Seller Central homepage.

Step 2: How to List Your Items on Amazon

Once you have your account, you need to list the items you want to sell.

For some people, we may be skipping a crucial step – choosing what items to sell. However, for this tutorial, I’m going to assume you’ve already done this. If you don’t know what to sell first, simply find some items around your house you want to get rid of (that’s what I did).

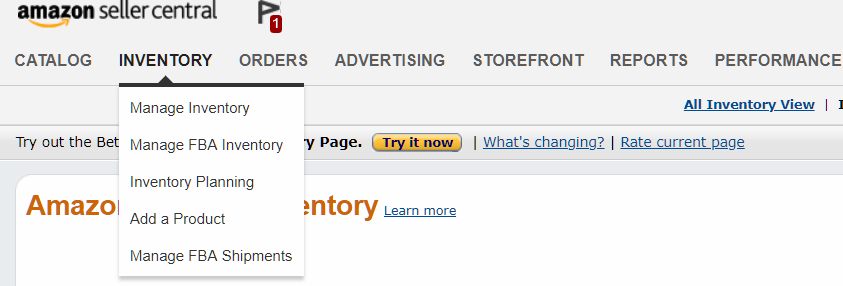
To add your first product, you want to go to “Inventory” in the top of your screen and click “Add a Product”.


Amazon FBA

Here’s where you will find the “Add a Product” button.


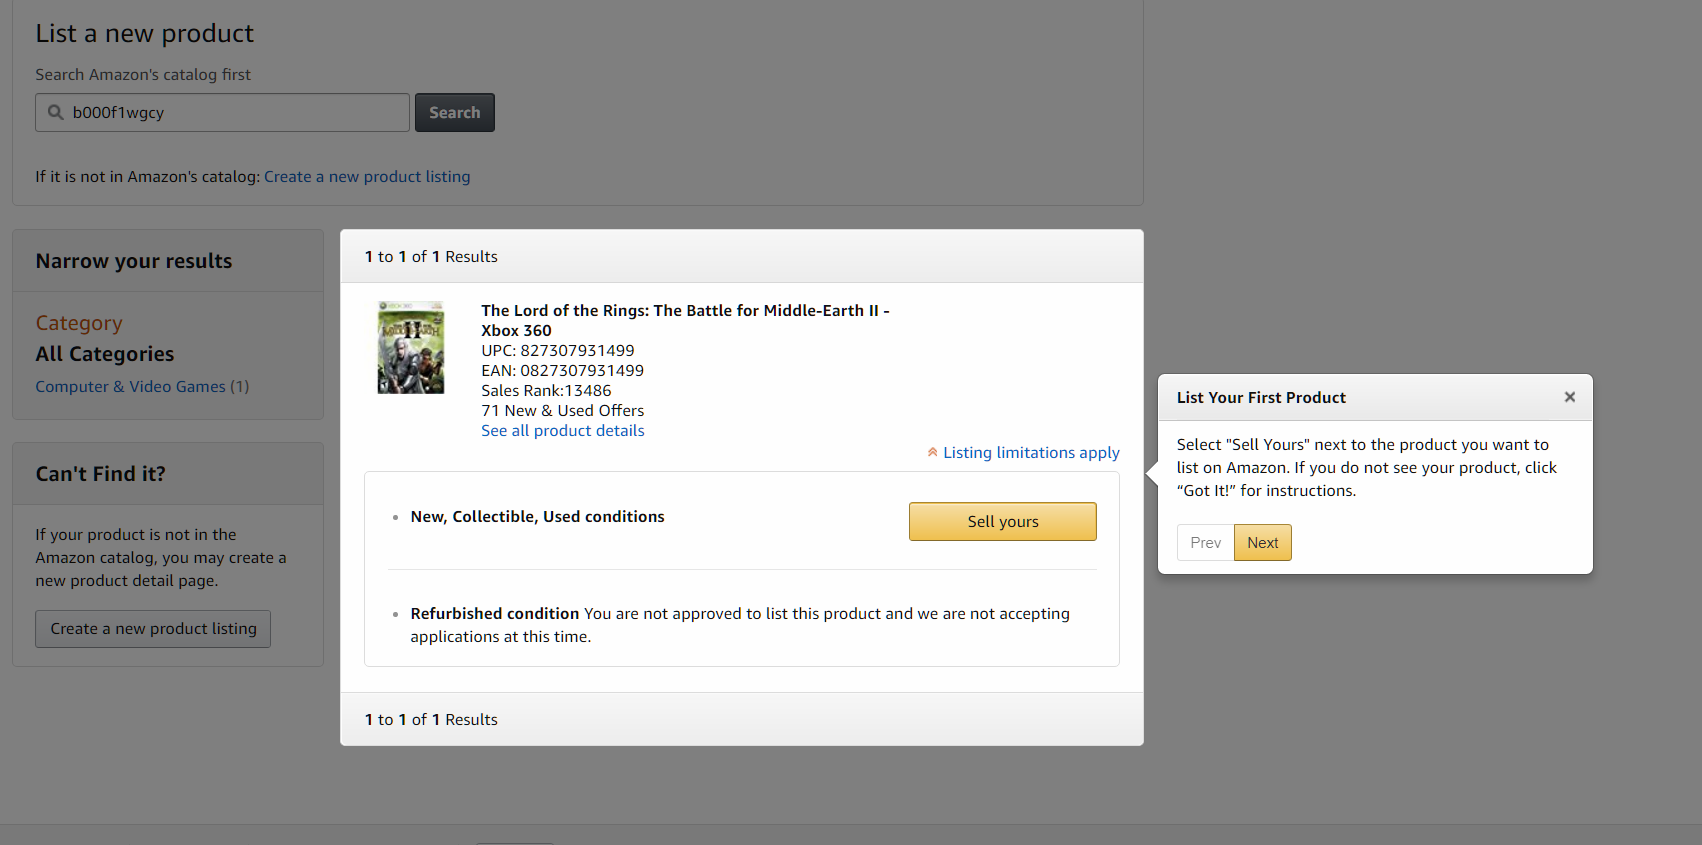
Once you click “Add a Product” you will be prompted to search for your product. I searched by barcode, however you can also search by the product name. Unless you’re selling an item you manufactured (which I’m assuming you’re not), you shouldn’t need to create a new product.

add Amazon product listing

Yes, I’m selling my old video games on Amazon.

Once you select your product, you’ll be taken to a screen to enter important product information. There are three main things you must enter.

  1. The price you want to sell your item for
  2. What condition your item is in
  3. Whether you want Amazon to ship the item or you want to ship it yourself

You can also check out Amazon product listing optimization best practices and learn more about what an Amazon ASIN number is.

For pricing, you choose what you feel comfortable selling your item at. Personally, I searched for the item on Amazon, looked at the used items that were eligible for free shipping, and priced my item slightly lower than the lowest price available. I wanted to make sure that I sold my games quickly.

For the condition, be as honest and descriptive as you can. All you are required to enter for the condition is a selection of “Acceptable”, “Good”, etc. However, you’ll be much more likely to sell it if you offer an additional description. Is your game missing the manual, but has the cover? Mention it. Is the book a library book you bought? Add this info too.

Don’t list an item at a better condition than it is. You won’t get away with it. If a customer expects a “like-new” book, they won’t accept one with tears and highlighting and they’ll request a refund. If you aren’t honest, customers will leave negative reviews, which will make it very hard for you to sell in the future.

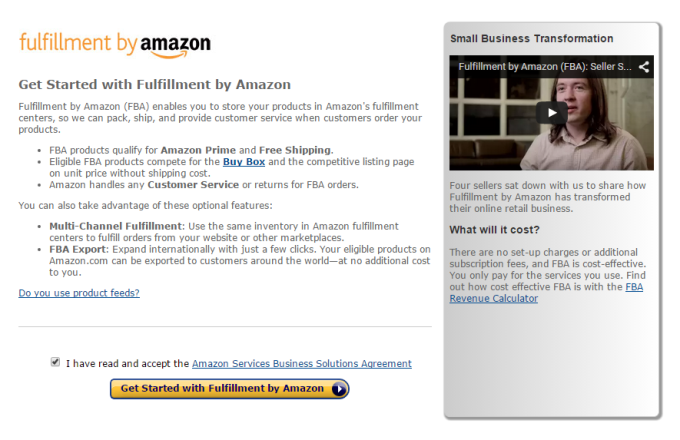
Lastly, you want to make sure you select “I want Amazon to ship and provide customer service for my items if they sell.” This is essentially the “I want to use FBA option”.

How to Sell on Amazon Using FBA Option

Here’s the check box that you need to make sure you check.

If you made sure to select that check box, and this is your first time selling on Amazon using FBA, Amazon will send you to a registration screen. Simply read and accept the terms of service here.

How to Sell on Amazon using FBA Terms

Step 3: How to Convert Your Items to Fulfillment by Amazon Items

I know what you’re thinking, “Why do I need to convert my items to FBA items if I just selected them to be fulfilled by Amazon?”. This just gives you the option to use Amazon FBA. You don’t have to use FBA for every item you sell. There are some items that can’t be shipped through Amazon FBA either. Therefore, you need to go into your account and manually select which items you want to fulfill through Amazon FBA.

To do this, go to the “Inventory” tab in your Seller Central homepage and click “Manage Inventory”. From here you’ll want to select the “Actions” drop down for each produce and select “Change to Fulfilled by Amazon”.

Please note: Once converted, your listings will be temporarily removed from Amazon.com until the inventory has been received at Amazon’s fulfillment center. So, you must finish the entire process to list and sell your items through Amazon FBA.

How to change your items to FBA items

Select “Change to Fulfilled by Amazon” the third option from the top.


Once you change your inventory to Fulfilled by Amazon, you’ll be asked about two preferences:

  1. FBA Label Service
  2. Stickerless, Commingled Inventory

If you’re selling new items, you can use stickerless, commingled inventory. This means that Amazon will commingle your inventory with other sellers’ matching units. If someone orders from you, Amazon might ship a matching unit that is actually from a different seller, but in warehouse closer to the customer. This allows Amazon to ship items faster for better customer service.

(If you’re choosing commingled inventory, please be aware of the risks. If another seller sells counterfeit products, they could be shipped in lieu of your authentic products before Amazon notices.)

In my case, I accepted this because I was not selling anything new.

Of the two, FBA Label Service was much more important to me. With their Label Service, Amazon puts a label (think white product sticker) on your items for you, instead of you doing it yourself.

I accepted the label service because I didn’t want to print out my own stickers. It was only 20 cents per item to have Amazon label my items. That being said, if you want to keep your margins high, you may consider printing your own stickers and labeling your products.

Once you select your options, you’ll be prompted to either “Convert Only” or “Convert & Send Inventory”. If you’re only selling one item, go ahead and select “Convert & Send Inventory”. If not, select “Convert Only” so we can add more items before we set up shipping.

Your item should now appear in your “Amazon-Fulfilled Inventory” under “Manage FBA Inventory” after viewing main “Inventory” tab in Seller Central.

manage amazon fba inventory

Here’s where to find your “Manage FBA Inventory” after enabling Amazon FBA.

Step 4: How To Create an Amazon FBA Shipping Plan

If you selected “Convert & Send Inventory” or if you have just added your second item, you will be prompted to create a shipping plan. For this you’ll need your Ship from address (most likely your house address) and your packing type.

There are two packing types: “Individual products” and “Case-packed products”. Most likely you’ll be selecting “Individual products”. Only select “Case-packed products” if you’re sending a box with all the same exact type of item in it. For example, a box of 20 Anchorman DVDs.

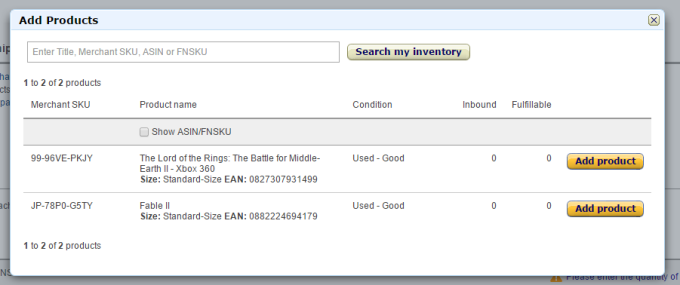
Once you set up a shipping plan, you will be prompted to add your items. Assuming this is the second item you’ve added, you should see two items. Select both.

Adding Products to FBA Shipping

Here were my two items I could add.

Once you’ve created a shipping plan, you can add all the items you wish to sell. Simply go through the same process you went through for the first two items, however, when you get to the end select “Add to an existing shipping plan” rather than “Create a new shipping plan”.

Step 5: How to Ship Your Products to Amazon for FBA

Now that you have all your items in your shipping plan, it’s time to finally ship your items. To do this go to “Inventory” -> “Manage FBA Shipments” and then click “Continue with shipping plan”.

From here enter how many units of each item you’re sending. Then if your item requires prep (most don’t) select whether you or Amazon will prep them. Lastly, select whether you or Amazon will label the product.

Once you approve your shipment, you can purchase shipping from Amazon. You just need to know how much your package weighs. You can either put it on a bathroom scale, or (as I did) just estimate based on the items inside the package.

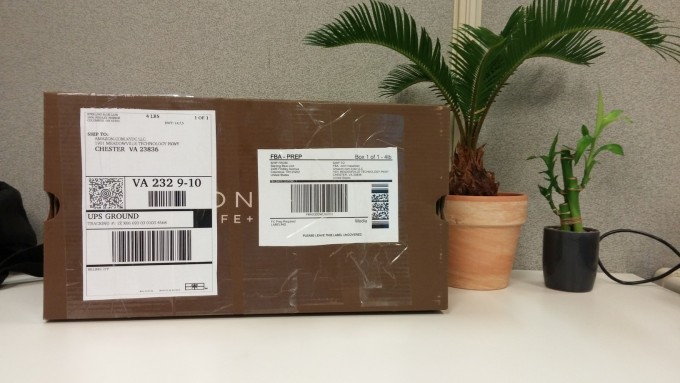
Once you print out your labels, stick them on your package and they’re ready to mail! Just drop them off at your local UPS.

Amazon FBA Shipment Box

Here’s my shipment box. Yes that is a shoe-box. Also pictured, my desk plants.

Step 6: How to Sell Your First Item on Amazon

This is the easy part. Once you ship your package off to Amazon and they receive it, your items will be available for purchase.

Now, you sit and wait for your items to be sold.

If you are selling a more popular item, the wait isn’t that long. In my case, I listed 8 items, and they all sold within 15 days.

Pro tip – video games sell fast! Check out other top tips for selling on Amazonhow to win the Amazon buy box, and what Amazon selling mistakes to avoid.

First Sale on Amazon

So it’s not too much, but it’s more than nothing.

What to Do Next

Congratulations! Hopefully you’ve either sold your first item or have at least listed your first item on Amazon.

If you haven’t made the plunge yet, but are still curious about Amazon FBA, check out our blog posts “Is Fulfillment by Amazon (FBA) Worth the Cost?” and “FBA Alternatives.”

Otherwise, if you have any questions or comments I would be happy to answer them in the comment section below.

Then, once you’re ready, learn how to connect Amazon and Amazon FBA to the rest of your business systems with multichannel integration!

9 Things You Need to Know Before Selling on Amazon

This is a long article, and you may not have time to read all of it right now. That’s why we’ve summarized the 9 most important things to know as a new Amazon seller below, in an ultra-condensed, bulleted list. For more detailed breakdowns of each of the 9 things you need to know before selling on Amazon, see the full article located below this summary.

  • The “Buy Box” is the box on a product detail page where customers can begin the purchasing process by adding items to their shopping carts. It’s a coveted position chosen by Amazon, and can mean lots of sales. (Ready to rake in those sales? Let’s get started.)
    • Competitive pricing, competitive offers, a history as an Amazon merchant and more seller reviews can all help you get a position in the Buy Box.
  • Fulfillment by Amazon is a program where you send your items for sale to one of the many Amazon fulfillment centers to be stocked. Customers buy those products from you, and Amazon will ship them. It differs from dropshipping in that you must provide the items to Amazon for sale – Amazon will not provide products for you. (If you’re more interested in dropshipping, read this awesome beginner’s guide to dropshipping.)
  • These are the types of merchants that perform particularly well on Amazon:
    • Merchants selling unique-to-them products.
    • Merchants who sell hobby or niche products.
    • Merchants selling refurbished or used products.
  • Why should I associate one of my products with an Amazon product that’s already listed?
    * Products can be listed only once in the Amazon catalog, so if you make a duplicate listing it will be deleted.
  • Why can’t I use certain shipping methods at first?
    * Certain shipping methods — such as two-day shipping — have to be earned by new merchants.
  • Why aren’t I being compensated correctly for shipping?
    * Amazon determines how much they think it should cost to ship a product based on a number of factors.
  • How can I increase the number of reviews on my Seller account?
    * Your best bet is to give customers a great shopping experience.
  • Are there any policies I should look over before I start selling on Amazon?
    * Yes. Click here to be taken to Amazon’s selling, shipping, and other important policies.

Want to read this post in its entirety? Great. To make sure your products are primed for success on Amazon (pun intended), here’s a detailed look at the nine most important things you should know before getting started as an Amazon merchant.

How to Sell Products on Amazon

Before setting up your own Amazon store, it’s worth taking the time to review the basics of selling things on Amazon. Even if you’re familiar with Amazon as a shopper, the way it works for sellers is quite different. Take a quick peek behind the curtain and learn about the most valuable listing positions on Amazon, how to get your product shipped out of Amazon’s warehouses, and some costly pitfalls to avoid.

1. What is the Buy Box, and how does Amazon decide who gets it?

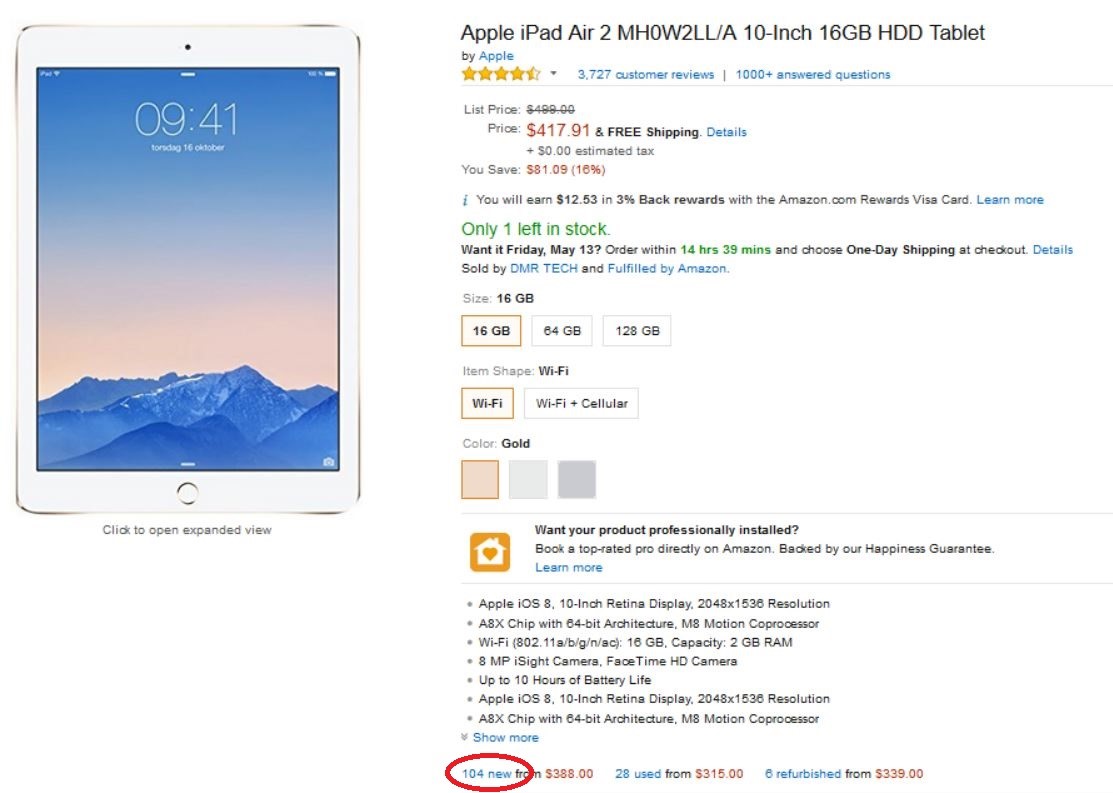
When browsing on Amazon, customers will navigate to a product’s main page and click on the “offers” links below the product description (as indicated by the red circle on the screenshot below) to see a list of available sellers.

vblog_Amaon1

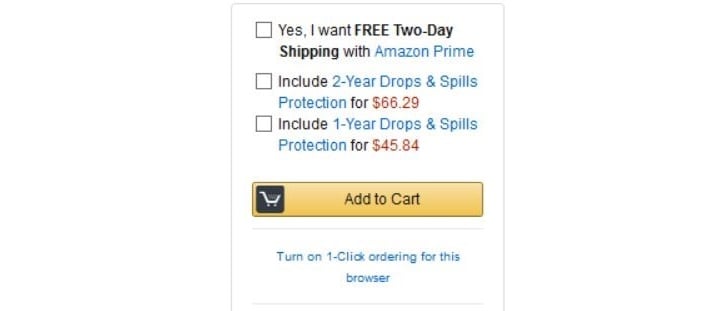
However, Amazon also gives merchants the ability to compete for the coveted “Buy Box” – the CTA button in that familiar shade of yellow. $56 billion of Amazon’s $64 billion in sales are made via the Buy Box – that’s 90% of total sales volume, so it’s imperative for any aspiring Amazon merchant to understand what the buy box is and how it works.

vblog_Amaon_2

This is the Buy Box, which drives 90% of sales.

The Buy Box is the box on a product detail page where customers can begin the purchasing process by adding items to their shopping carts. Rather than reviewing a list of available merchants, the Buy Box allows customers to quickly purchase a product from the Featured Seller – the business Amazon has chosen to receive the bulk of sales.

Because a key feature of the Amazon platform is that multiple sellers can offer the same product, becoming the featured seller who wins the Buy Box is very difficult. In fact, it’s pretty unrealistic to think that your site is ever going to get ranked high enough to become the featured seller. (Don’t worry – there are plenty of other ways for small businesses to make money on Amazon even if you can’t get a Buy Box. Just keep reading this article!)

In order to be eligible for the buy box, you must meet the following four criteria:

  • Make sure you have a Professional Seller Account.
    Only Professional Plan sellers are eligible for the Buy Box, so if you want to make money you’ve got to spend money – in this case, about $40 a month. Click here for more information about Amazon’s selling plans and prices.
  • Know the difference between the Buy Box and the Buy Used Box.

There are separate Buy Boxes for new and used products. Used products are not eligible to be featured in the Buy Box, and new products are not eligible to be featured in the Buy Used Box.

Amazon Buy Used Box Screenshot

The Buy Box vs. the Used Buy Box.

If you’re selling used products on Amazon, make sure to factor the Buy Used Box into your strategy. The overall sales volume of the Buy Used Box doesn’t match that of the Buy Box, but lower competition can make it much easier for small merchants to obtain valuable product positioning.

  • Make sure your item is in stock.
    If your item is out of stock, you will immediately lose your Buy Box spot to another seller who DOES have that item in stock. If you ever get a Buy Box spot, make sure to ensure that you’ve always got an adequate supply. While you can get your Buy Box spot back after you’ve restocked your inventory, it’s never 100% certain. Plus, the loss of sales due to the loss of a Buy Box is punishment enough, so make sure supply meets demand!
  • Check your Buy Box eligibility within your Amazon Seller Central account.
    Even if you’ve met all of the requirements above, you still must be an Amazon merchant with at least 2 to 6 months of sales history as well as a high level of sales performance. (Sorry – we did warn you that the Buy Box is hard to get!)

Your eligibility information is shown in your Amazon Seller Central account. To view it, follow these steps:

  • Within Amazon Celler Central, click the Inventory tab and navigate to Manage Inventory
  • Look for a field labelled “Buy Box Eligible” within the Column Display section
  • Select “Show When Available” from the drop-down menu to sort products by which are Buy Box eligible. If you see a “Yes” within the Buy Box Eligible field for a product, you are eligible to win the Buy Box for that product.

2. How does Amazon determine the order of the Merchant Offers List?

Even if you never win the Boy Box listing, you can still make money selling on Amazon by selling through the Merchant Offers List. Many of the things Amazon values fall in line with ecommerce best practices, so it’s in your best interest to be doing these things anyway.

A number of factors affect where a merchant appears in the Offers List, including:

  • Competitive pricing. This includes not only the product cost, but shipping costs as well. Many shoppers expect to see low prices while browsing Amazon, so be prepared to price competitively to beat the competition.
  • Competing offers. Generally, the more sellers there are, the harder it is to climb to the top. Finding products with fewer competing merchants can make it easier to get your product featured in competitive spots – maybe even the Buy Box. Being the first to pick up on trends can mean that you find popular products before they’re popular, and set up a history as a high-performing seller before the market is oversaturated with competitors.
  • How much history the merchant has on Amazon as a seller. Merchants who have long, positive selling histories with Amazon have better chances of obtaining one of the top spots. Making sure that you address negative reviews and other customer service issues quickly and effectively is critical to ensuring that you maintain a positive sales history – too many unhappy customers and you’ll be exiled to the bottom of the merchant list.
  • How many Seller reviews the merchant has on Amazon. Online reviews have a huge impact in driving sales, and can really end up making or breaking your business. Focus on encouraging buyers to leave reviews for your products, and make sure to address negative reviews quickly and effectively.

As a general rule of thumb, the most effective solution is to ensure that any transactions you receive through Amazon run as smoothly as possible. That means delivering your product in a timely manner and communicating with your customers along the way. However, if you’re looking to break into the market a little quicker, here are two shortcuts that can help:

  • Start by selling a low-competition item to boost your seller ranking. This will increase the probability that the offer will show higher for more competitive products.
  • Try offering a very competitive price on a popular product. This draws in bargain shoppers and can increase your seller ranking. You can check out Amazon’s “Most Wished For” list to see the most popular items by industry if you need some inspiration.

3. What is Fulfillment by Amazon (FBA)?

Fulfillment by Amazon is a program where you send your merchandise to one of the many Amazon fulfillment centers to be stocked; then customers buy products from you, and Amazon ships them. This sort of arrangement allows you to focus on other aspects of running your business while Amazon handles many facets of shipping and customer service.

Other benefits include extending the reach of your products to Amazon Prime members, and gaining an extra push towards winning the Buy Box, even if your products have a bit of a higher price. With Volusion, merchants have the ability to set up different shipping options including dropshipping, which allows flexibility to try using FBA. You can learn more about Fulfillment by Amazon here.

4. What types of merchants tend to benefit the most from selling products on Amazon?

Three kinds of merchants tend to perform particularly well on Amazon:

  • Merchants selling unique-to-them products. Companies who produce their own products, such as a company that designs its own jewelry. Since their products are unique, they face less competition from other merchants selling identical items, and have more flexibility over their prices.
  • Merchants who sell hobby or niche products. Amazon generally won’t start fulfilling or carrying hobby or niche products, so there’s less of a risk you’d have to compete with Amazon itself.
  • Merchants selling refurbished or used products. Amazon has a huge market for these products, as they attract shoppers whose main concern is price and don’t mind waiting on shipping. It is worth noting, however, that used products cannot win the regular Buy Box spot – only the Used Buy Box, which drives fewer sales.

That said, the benefit of owning your store’s URL and fully branded website cannot be overstated; this gives an extra level of credibility and authority, and visitors are more likely to remember you versus someone else. Many merchants who achieve popularity on Amazon still find it essential to have control over their own ecommerce website and branding. This allows them to achieve a fully independent store presence and market to large audiences outside of Amazon through other marketing channels.

5. Why should I associate one of my products with an Amazon product that’s already listed?

Products are only allowed to be listed once in the Amazon catalog, so creating a second product detail page for an existing product will result in your listing being removed. By matching your product to the product detail page that already exists, your offer has a chance to be seen.

6. Why can’t I use certain shipping methods at first?

Amazon doesn’t allow new merchants to offer certain shipping methods right off the bat, such as two-day shipping. These shipping methods have to be earned by establishing a history of reliable shipping at the slower shipping speeds. Offering your products through FBA is a way to bypass this, as FBA products are automatically eligible for Prime Free Two-Day Shipping.

7. Why aren’t I being compensated correctly for shipping?

Amazon determines how much they think it should cost to ship a product based on the merchant’s origin, the customer’s address and the given weight of the product. However, oftentimes the amount of money that Amazon reimburses merchants for shipping won’t match the actual shipping cost. Making sure that your item weight and dimensions are listed correctly will help make these shipping estimates as accurate as possible. However, it may still be necessary to factor this into your pricing decisions – sometimes, you’ll need to increase the price of a product to offset Amazon’s too-low pricing estimates. If you’re having problems making a profit after shipping costs, you’re probably pricing too cheaply.

8. How can I increase the number of reviews on my Seller account?

Please note that merchants are forbidden from soliciting or paying for Seller Account reviews. Any sellers who engage in these practices risk having their accounts suspended. Your best bet is to give customers a great shopping experience (including aspects like product price, clear and informative customer communication and shipping reliability) so they want to vouch for you on their own. If your business is hurting for reviews, we have some advice to help you out.

9. Are there any policies I should look over before I start selling on Amazon?

Here are some policies you may want to review before selling on Amazon:

When deciding to sell on Amazon, the best advice we have is to know your business, and know what you’re getting into. A new Amazon integration means a lot of new opportunities. By doing your homework and focusing on your business’ needs, you’ll be taking your online success to the next level in no time. If you’re interested in checking out what Volusion can offer with Amazon integration, click the button below to start your free trial today!

How To Sell On Amazon FBA In 2018

The ultimate guide to getting started with an Amazon FBA business. Read it today!

If you want financial freedom, a fun side hustle, or an infinitely scalable business, you’re going to want to know how to sell on Amazon FBA.

How would it feel if I told you there was a way that you could buy products on clearance and then resell them on Amazon for a profit? Would the idea of making money while you shop be appealing to you?

If you said yes, then I have great news for you. Because buying retail items and selling on Amazon is a business that has made me hundreds of thousands of dollars. And you can learn how to make money selling on Amazon, too.

This post is going to show you everything you need to know to get started as an Amazon FBA seller. I created this how to sell on Amazon beginners guide to take you from the concept of selling on Amazon to opening your Amazon Seller account and being able to find stuff to sell on Amazon.

In this guide, you’ll learn:

• What is Amazon FBA (and why FBA is so much more than just “selling on Amazon”)
• How Amazon selling changed my family’s life (and what it can do for yours!)
• Ways you can “test the water” (aka sell on Amazon for free) before diving in as an Amazon seller
• How to find products to sell on Amazon (that will make money)
• The 3 biggest beginner sourcing mistakes (and how to avoid them!)
• How to ship your products to Amazon without paying a fortune on shipping fees
• How to make your products available for sale on Amazon (hint: no expensive photography equipment required!)
• The steps needed to open your Amazon Seller account so that you can start selling right away!

Later, I’m going to give you one of my paid training videos for free that walks you through the account setup process step-by-step. I want this post to inspire you to take action, so I’m going to give you all the info you need to get started!

Before you dive in, I want to let you know that this is a long blog post. So I want to go ahead and tell you who should take the time to read this post (and who should walk away right now – no hard feelings!).

Selling on Amazon FBA is perfect for you if…

✓ Making money as a side hustle
✓ Replacing a full-time 9-to-5 income
✓ Parents who want to support their family (from home!)
✓ Entrepreneurs who want to build a scalable business

Selling on Amazon FBA is NOT a good fit for you if you…

× Are looking to get rich quick
× Want a hands-off business
× Need a super fast return on your investment
× Aren’t willing to do the work

Alright, are we all clear now? Let’s go ahead and get started!

One quick caveat, I wrote this guide with the US based seller in mind.  Although you can sell on Amazon if you live international, this guide is not the one for you.

My Personal Story of Learning How to Sell on Amazon FBA

Back in 2008, like a lot of other people, I found myself out of work. But I didn’t want to start job hunting. In fact, I knew that I never wanted to work for someone else again! So I dove into selling stuff online with everything I had.

I started with eBay but soon discovered that if I created an Amazon account and used the Amazon FBA program, I could scale my business much faster (without having to put in a bunch more time and effort).

With my eBay business, I had to personally list, store, and ship every item that I wanted to sell online. Most items I was selling were one-off items, so I was starting from scratch with each thing I sold. Honestly, I was almost as burned out as I was at my old job!

Switching to the Amazon FBA business model, I was able to sell things on Amazon much quicker and easier than I was selling them on eBay. It took me a while to figure out what products to buy to sell on Amazon, but I was willing to put in the work to learn FBA. I ended up choosing Retail Arbitrage as my business model meaning I bought from local stores and then listed them for sale on Amazon.

The Amazon FBA (Fulfillment by Amazon) Program was the secret I needed to go from making $1,000 a month using eBay to making over $5,000 a month using fulfillment by Amazon and working part-time.

My husband was even able to quit his job and sell on Amazon with me. Him joining me in the business happened just a couple of years after I had started my business selling stuff online with the Amazon FBA program.

Together, we spend our days sourcing products from local retail stores like CVS, Walgreens, Target, and Grocery Outlet. To find things to sell, we use Amazon scanning apps on our phones to look for products that are discounted enough in the store and selling for high enough on Amazon that we can make a profit!

One of the best ways we found to source products for our Amazon FBA business was from Liquidation Stores where we could sometimes buy pallets of products at rock bottom prices.

It has been such a blessing to be able to work from home and make good money by selling on Amazon. I’m so glad I decided to open my Amazon seller account and figure out how to start selling on Amazon.

What Will Your Amazon Story Be?

I wanted to share my story so that you could see what’s possible. Did any of it resonate with you?

There were a lot of times I could have stopped along the way to creating a six-figure business. Times when I could have gone back to the “safety” of a “real job.”

But I was determined to make it work, and that’s why I took that first big step to become an Amazon seller and create an Amazon seller account. I was able to start making real money for my family.

As you read the rest of this guide, imagine what your story will look like as you move forward starting an Amazon business. How could an extra $500, $1,000, or even $5,000 a month help you and your family? Could you save for a house, take that family vacation, or finally quit your crummy 9-to-5 job?

I know plenty of sellers who have gone from clueless beginners to successful Amazon sellers, so remember that you can do it too!

Now I want to explain what Amazon FBA is and show you why it’s such a great business model. Then I’ll show you how to sell things on Amazon!

How to Sell on Amazon Prime

Many people think that to succeed as an online reseller, you have to create your own website. Even if they know a little about how Amazon works, they believe that they must be starting an Amazon store. That’s actually not how it works.

When you sell on Amazon, you are the owner of an online retail store, except your store is just part of the Amazon.com site.

The reason this works is because Amazon allows Third-Party Sellers (like me) to sell on their site. You see, not everything sold on Amazon is sold by Amazon. Being able to list on Amazon gives third-party sellers a chance to run their own Amazon businesses!

This is actually the entire basis of the Fulfillment by Amazon business model. You sell the items, and then they are fulfilled by Amazon.

You may not have even realized that Amazon has 3rd-party sellers (people other than Amazon, the company) who sell on the site!

Here is an example of a product page on Amazon; the red arrow shows that if you click on the “Add to Cart” button, you are buying from Amazon.com.

The blue arrow shows other sellers, people like you and me, who are sharing that page with Amazon to sell the same product.


What Does Selling On Amazon Mean? Here are 3rd Party Sellers Shown in The Buy Box

Now, why would someone choose to pay MORE from one of those 3rd-party sellers instead of just ordering from Amazon and paying less?

That’s a great question, and I’m glad you asked 😉

The goal for most people selling on Amazon is NOT to compete with Amazon for sales. I only show the example above to show you the difference in the types of sellers on Amazon.

Let’s look at a different item and see what things look like when Amazon is not one of the sellers.

What It Looks Like When A 3rd Party Is Selling An Item on Amazon FBA

In this picture, we can see that the “Mikes Super Store” is selling the party set on Amazon. He is also using the “Fulfilled by Amazon” program.

That means that as a Prime member, I can order from “Mike” and get the same treatment as I would buying the item directly from Amazon!

So I don’t look at Mike any differently than I would if Amazon were selling the item. And the truth is, most people don’t even notice that it doesn’t say “Sold by Amazon.com.”  They see Fulfilled by Amazon and that they can get Two-Day Shipping on the order if they are Prime members.  Or free super saver shipping if they are non-Prime members.

Then they click Buy It Now! Or, they can easily add it to their cart to buy later.

You see, “Selling on Amazon” means that you get to list your products for sale on the Amazon.com website. Then Amazon’s buyers get to purchase from you.

All the while, you haven’t had to create a new website, spend money on ads to get customers, or even ship your items to the customer.

Pretty cool huh? And that’s why we use and recommend the FBA program.

The specific way that I teach people how to sell on Amazon FBA is by buying products locally and then reselling them on Amazon. There are other models of finding inventory to sell on Amazon. I just feel that this one called “retail arbitrage” is the easiest and best one to start out with as a beginner.

Buy low – sell high! That is what selling on Amazon is all about. And instead of trying to build your own brand (i.e., Private Label), you get to use the reputation that major brands have already created!

Once you’ve bought some retail items, you get to send them off to Amazon all at once. This saves a ton on shipping versus shipping each product individually to each customer. It also saves you from taking dozens of trips to the post office! One of those main reasons why I switched to Amazon from eBay!

And then of course once Amazon has received your items, they do everything else! They handle all aspects of selling that relate to fulfillment. You just sit back and watch the sales roll in 😉

Why Amazon FBA Is the Best Way to Sell Online

Now that you understand the basics of selling on Amazon, we need to talk about the Fulfillment By Amazon (FBA) program and why it is such a game changer for reselling stuff online!

There are a ton of benefits to using the Fulfilled by Amazon program. I know some of you are thinking “I don’t care about the benefits, I just want to sell already!”

Well, hear me out. If you don’t understand the real benefits of FBA (for both sellers AND customers), then you’re going to have a hard time seeing why it’s such a smart business model.

I’ve found that people who don’t take the time to think through the why of FBA give up fast. They immediately fill with doubt and message me things like:

  • “Why would someone pay so much more for one of my items when they could get it at Walmart for less?”
  • “Doesn’t Amazon have all those FEES. I’ll just start my own website!”
  • “I’m doing pretty well on eBay. Maybe I’ll just stick with that.”

So trust me when I tell you that this information is essential for new Amazon FBA sellers.

Amazon FBA vs. eBay

You remember at the beginning of this guide I talked about selling on eBay and how I couldn’t scale up the business?

Well, Amazon FBA is what made it so I could scale up the business.

When I was selling on eBay, even though I was clearing almost $2,000 a month in profit, I didn’t have much room or ability to grow the business.

If I wanted to make more money, it meant I had to:

  • find more products
  • create more listings
  • store more inventory
  • ship more items
  • deal with more customers 😫

I was already spending a lot of time on the business. I couldn’t imaging DOUBLING IT. I needed a way to double my income without having to find more hours in the day!

So, when I realized that I could sell more items on Amazon without adding to my daily workload, I was sold! With Amazon FBA, it doesn’t take much more effort to 2x or even 5x my sales volume.

Amazon FBA vs. Amazon Fulfilled by Merchant

Many beginners getting started with a new Amazon seller account think that they should just list the products and ship the products to the customers themselves. They figure, hey, I’ll save on the fees by doing it myself. This is a BAD idea!

This is called Merchant Fulfilling (MF). And once you start exploring Amazon more, you’ll see that there are plenty of sellers using the Fulfilled by Merchant platform.

But I am going to keep this post all about selling on Amazon using FBA only, so I won’t be discussing the merchant fulfilled option. I just want to remind you that with merchant fulfilling, it’s a whole lot more like eBay. To scale your business as a MF seller, you’ll have to:

  • Have the space to store tons of inventory
  • Buy (and store) all kinds of shipping supplies
  • Take constant trips to the post office
  • Deal with angry Amazon customers who don’t understand why your item didn’t arrive in 2 days
  • Receive and process your own returns

Oh, all while finding the time to go source for new inventory!

Remember, for Amazon selling to work as a scalable business (and not a business where you’re chained to your desk like a 9-to-5), you have to use the FBA program!

Related post: Six Reasons Why You Should Merchant Fulfill On Amazon

Amazon FBA vs Building Your Own Website

A lot of people think they can just throw up a website and sell items there instead of on Amazon. To them, they imagine that this will be PURE PROFIT without any Amazon fees.

Well, those sellers are ignoring the fact that Amazon is a MASSIVE online retailer.

In fact, Amazon is quickly becoming the world’s largest search engine as well. People often head to Amazon when they are looking for something — even before searching Google.

When they do actually search Google for a physical product they want to buy, Amazon is usually ranked #1 there too! So Amazon is just grabbing up all that traffic from online shoppers.

I tell you this because it is one of the main reasons we sell on Amazon rather than trying to build our own website. Could you even imagine trying to compete with Amazon.com for traffic? Um, me neither!

Here’s the good news for FBA sellers: Amazon allows us to sell on their platform, thus SHARING that traffic with us.  They do the hard work of getting customers to their site, and we get to sell our products to those customers!

Yes, this comes at a cost (in the form of fees), but that cost doesn’t compare with trying to build a website and spending your own money on marketing (and then feeling lucky to watch one or two sales come in per day).

The BEST Amazon Customers (who only buy from FBA sellers!)

I know I mentioned that with merchant fulfilling and eBay you have to do all of the work. And with starting your own website, you’d have to do all the marketing and probably pay for traffic.

But to be honest, I still haven’t mentioned the BEST reason to use the FBA program!

The most significant benefit is that when you use the Fulfillment By Amazon program, your products become Prime eligible!

Amazon does a ton of marketing to get people to join its Prime Program. People spend $119/year so that they can have unlimited “free” 2-day shipping on items sold on Amazon.com.

Amazon even offers Prime members who live in major cities free same-day shipping.

There are other benefits as well, but let’s just focus on the free shipping.Benefits of selling on amazon using FBA are you get featured to Prime buyersIf someone spends $119 to get free shipping, do you think they are going to choose to buy from a seller who offers free shipping or from someone where they have to pay an extra shipping cost?

I know what choice I make…EVERY SINGLE TIME.

Even if the merchant fulfilling seller offers free shipping, buyers still have to wait 4, 7, or even 14 days for items to arrive (the agony!!). If you are a Prime Member yourself, I think you know the hassle of having to wait and pay extra for shipping, right?

As a Prime buyer myself, I ALWAYS choose FBA sellers over merchant fulfilled sellers. EVEN IF the price is higher, I prefer the Prime seller. And not just because I’m impatient, but because I trust that the item will arrive quickly and as described.

Amazon has spent decades cultivating buyer trust across their platform, and with FBA, that trust is extended to third-party sellers as well. You really can’t put a price on that!

And THIS is where the power of being an Amazon FBA seller comes in!Amazon buyers are trained to look for prime sellers

Amazon has trained us as buyers to look for Prime Sellers!

Take a look below and see which seller you would choose to buy from if you were a Prime member.

Amazon buying choices showing prime versus merchant fulfilled

If I place an order from the first seller, I will receive the item on Sunday, which is in 2 days. I am writing this on a Friday and the second seller probably won’t even ship my order out until Monday.  And because they are in TN and I am in CA, we are probably looking at an additional 5 days for me to receive the order. So, maybe next Friday I will get it. Possibly longer.

The thing is, I honestly would choose seller number one even if they were like $5-$7 higher than the merchant fulfilled seller. Just for the convenience of fast and secure shipping.

Thankfully, many people think the same way that I do, so this business model works well!!

Amazon FBA and Personal Freedom

You can probably tell that selling on Amazon FBA does require some work (I’ll be going into full detail on that shortly). So it’s not a truly passive income source. But it does still offer a lot of personal freedom!

Unlike with eBay, I can now send items into Amazon and then take a week off if I want to. That’s because all of my sold items will be processed and handled without any input from me!

It’s an incredibly flexible business. You can run it solo or with a partner. You can do it in 5 hours a week or 40. You get out of it what you put into it, which means you can make it work for you.

And isn’t that what running a business is really about? What’s the point of starting a side hustle and finding out that it requires 50 hours of work each week? And what’s the point of being your own boss if you can’t enjoy a vacation every once in a while?

I know super part-time sellers who are thrilled to pocket an extra $500 each month. And I know full-time sellers who have hustled their way to seven figures. There’s no right or wrong path for running an Amazon FBA business. As long as it works for you!

Amazon FBA and Financial Freedom

I’ve been dropping hints about the beauty of Amazon FBA as a business model: it’s infinitely scalable.

On the financial side (just like with the working hours), you do get out of it what you put into it.

At some point near the beginning of your Amazon journey, your business will start to make a profit. At that time, you’ll have a decision to make: should you pocket the extra cash or reinvest in your business?

I can’t tell you what to do, but many sellers choose to grow (scale) their business by using their profits to buy more inventory.

This is a way to quickly grow your business and get it to a place where you can afford to start paying yourself.

Think of the early stages as a Profit Snowball (or “Feeding the Beast” as a lot of my students say!):

For example, you start with $300 worth of inventory. When that all sells, Amazon pays you $500. Instead of pocketing the $200, you spend all $500 on buying more stock. When that all sells, you now have $800 (you see how this goes on and on!).

You can work your way to $1,000 per month and call it a day, or you can choose to keep reinvesting profits to grow your business to something bigger!

Amazon FBA is Great for Beginners

A lot of “flipping” businesses require deep pockets. Look at flipping real estate.  If you want to turn that dilapidated shack into a cool condo, you’ve still got to pay tens of thousands of dollars to get started.

Even other Amazon business models like Private Label require a hearty initial investment.  This is why I always recommend starting with retail arbitrage.

With Amazon FBA and retail arbitrage, beginners can start a business for less than $1,000. There aren’t many other businesses you can start on a shoestring budget like that!

I also like to remind new Amazon FBA sellers that you don’t have to go all-in right away. There’s nothing wrong with sending in an initial shipment of fewer than 20 items and seeing how it goes. If it’s not for you, you can bow out without having made an enormous investment.

Amazon FBA is cost-friendly and beginner-friendly, so it’s safe to try out!

Related post: How Much Money Do You Need To Start An Amazon FBA Business

What Amazon Handles (so you can focus on running your business!)

So other than access to Prime Buyers, there is one significant additional benefit to FBA: Amazon handles a large portion of the selling process for you!

Actually, they handle the most laborious and most time-consuming parts!

Let me list the steps of selling a product on Amazon so you can see what parts the seller handles and what parts Amazon handles (when we use FBA):

Things you need to do:

  1. You find a product to sell on Amazon
  2. You list the product on Amazon.com (does not go “live” at this point)
  3. You prepare the items to send to Amazon’s warehouses
  4. You ship the items to Amazon’s warehouses

What Amazon does:

  1. Amazon unpacks and stores your inventory for you
  2. Your product shows up live on Amazon.com (according to where you listed in step #2)
  3. Your product is featured as a Prime Eligible purchase
  4. An Amazon customer places an order from you
  5. The Amazon warehouse workers find, package, and ship your product to the customer
  6. Your customer receives the product in 2 days (if they are a Prime member)
  7. The Customer is happy!
  8. If the customer is unhappy, Amazon customer service handles all refunds, returns, and exchanges. The customer won’t even bother you!

As you can see, we are responsible for finding the products we want to sell on Amazon, listing them in our account, and preparing them to send to Amazon, then actually getting the items to Amazon.

Once the products are listed and are ready for sale, we “hand them off” to Amazon and they do the rest!

When the product sells, Amazon handles finding the right size box, scheduling the shipment, packing the item, and making sure it gets to the buyer on time.

Fulfillment By Amazon is the MAIN reason that I stopped selling on eBay and went all-in with Amazon.

How Amazon FBA Works Infographic

How to Start Selling on Amazon

If you’re still reading, I know you are convinced of the fantastic benefits of selling on Amazon as a FBA seller. Now I want to show you how easy it is to get started.

I’m going to show you how you can test the process and then take you through those first 4 steps of sourcing, listing, prepping, and shipping.

Testing the Waters

There is an easy way to test the process, in which I’ll show you how to sell on Amazon for free. It may not the most efficient way to find products, but it’s something you can do from home without even having to create an Amazon seller account.

Hopefully, by going through these steps, things will start to click, and you’ll see what kinds of products could make you money through the FBA program.

This method uses the Amazon FBA Calculator to show you how much you would make selling items that are listed on Amazon already. This will show you all of the Amazon fees and your profit, and you don’t even need an account to use it.

You can test this out using products you have around your house, or by looking up products you find in online stores.

At this stage, you’re not looking for products that you’re actually going to sell. This is just to get an idea of how the process works.

For example, let’s look at this red can opener I found online. It could be purchased for $10 at Target for 75% off.

Searching this item on Amazon, by typing the item name into the search bar on Amazon.com, we can see (at the time of this writing) that this can opener is listed for almost $30.

Hamilton Beach Can Opener For example of selling on amazon

Next, we would look the item up on the Amazon FBA Calculator and add in the following details:

#1 the price it is selling for on Amazon,

#2 the inbound shipping cost. I calculate this at roughly $.50 a pound (if this seems low, that’s because we get really good discounted shipping rates as FBA sellers).

#3 the amount you paid for the item ($10) at Target

When you click “calculate,” you will get #4 – the profit you would make on that item if it sells for the price listed.

See below for an example and to see how to use this calculator.

So Amazon would pay you $18.37 (Seller Proceeds), and that would bring your net profit to $8.37!  This is after your purchase price and expenses of sending the items to Amazon.

$8.37 isn’t bad, but what if you ordered and sold 5 of those can openers…Now you are looking at a profit of $41.85.

Related post: How to Use the Amazon Revenue Calculator to Know Your Profit

So take a minute here and try this step out. Look around your house and think about what you paid for items when you bought them and could you sell them on Amazon for a profit. Maybe take a peek at kitchen gadgets, books, and your favorite grocery items.

If you need free inventory, you can start at home!  We all have a few brand new items laying around, right?  Maybe a birthday gift you weren’t too into.  Or a wedding present that was a duplicate.

You can get started with these items, and at the cost of ZERO, you are bound to make a profit and give yourself some seed money.

While you are looking through your stuff, why not call some family members and ask if they have any new things you could take off their hands?  You never know what you can end up with to get your new business started for free.

Or, go to some online shopping sites and look at sale items. Could any of them make a profit through Amazon FBA?

What You Need to Get Started

If you’re ready to get started, here are the basic things you will need before you start. I’ll be going over more specifics later, but this is what I recommend new sellers already have before starting:

  • Tech basics: desktop or laptop computer, printer, and smartphone
  • An Amazon seller account so that you can use the Amazon Seller App on your smartphone
  • Basic supplies: Boxes, shipping tape, address labels, and a scale
  • Money to spend on inventory: $500

$500 is a significant amount of “seed money” to start out with for your initial inventory purchase. By spending at least this amount, you’ll have enough inventory to start seeing sales right away.

Remember, the sooner you get sales, the sooner you’ll have more money to reinvest in your “profit snowball.”

Now, if you absolutely don’t have $500 to spend or you are still skeptical, that’s ok, too. The great thing about Amazon FBA is that there’s no minimum to get started.

If you can only afford to ship in a few items on your first shipment, that is an option. You can start small and grow later.

Just keep in mind that you will not have big sales from a small amount of inventory. As long as you have realistic expectations, then that will help you stick with it so that you can grow.

How to Find Products to Sell on Amazon

There are 5 main different ways of finding inventory that people use for selling on Amazon.

They are:

  • Retail Arbitrage
  • Online Arbitrage
  • Private Label
  • Wholesale
  • Dropshipping

The way that we teach people to “source” (the term for finding products) in our Amazon Boot Campcourse is “Retail Arbitrage”.

This means buying products from retail stores and then reselling the products on Amazon.  This also goes hand in hand with Online Arbitrage.  The main difference is if you are going to an actual store or not.  So, as we talk about retail arbitrage in this post and give tips, know that they apply as easily to Online Arbitrage.

The goal of Retail Arbitrage is to find products that are being sold at enough of a discount in the store that we can “flip” them on Amazon for a profit even after paying for the item and Amazon taking its “cut,” which is about 30% of the total selling price.

To find the products, we head to local stores with our smartphones in hand. Then we use a scanning app on our phone that will tell us what the item is currently selling for on Amazon. We can then enter our cost of the item, and the app will show us if we would make any profit.

By scanning, I mean we use the camera on our phone, with the app open, and then “scan” the item’s UPC barcode.

12 Days Of Disney Socks Shown On The Amazon Seller App

The Amazon Seller App


The picture above is what it looks like when we scan a product using the Amazon Seller App. This is the app that you can download for free once you have created your seller account.

In the store, we are easily able to see how much an item is selling for on Amazon and what they payout (Gross Proceeds) will be if we are to sell the product.

From this information, we would still need to take out the cost of the product we want to purchase.

In the example above, the item costs $15 at Target.

So, we can put into the Amazon Seller App a cost of $15 and see the following information.
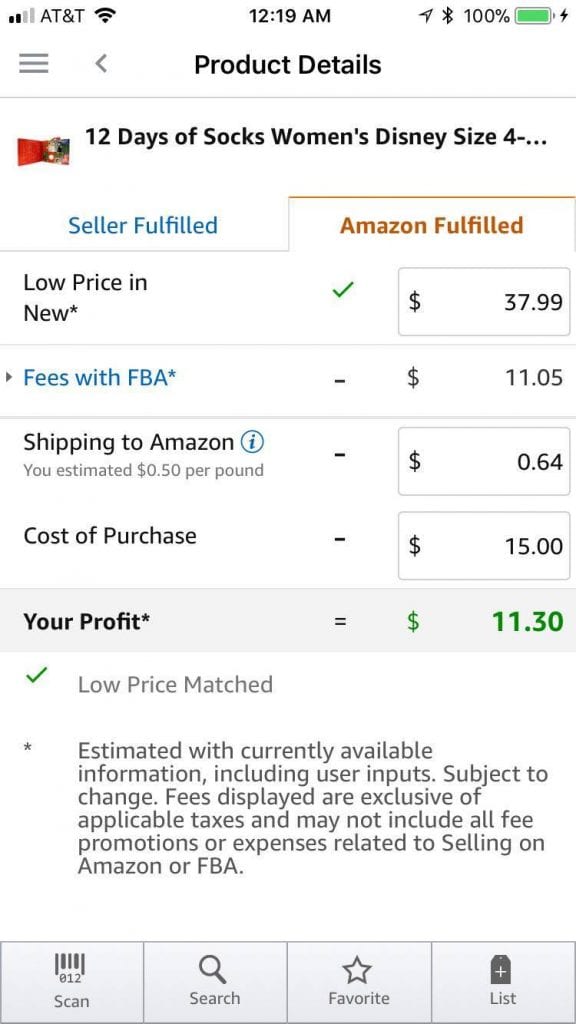
How To Add Your Purchase Price To The Amazon Seller App

Adding Your Price To The Amazon Seller App

So, while we are still in the store looking at this item, we see on the FBA calculator that our profit would be $11.30 if we sold these socks for $37.99.

In stores, we scan all kinds of things looking for stuff we can sell on Amazon. Usually, we start with the clearance items, then we look at specialty / seasonal items.

To use the app I am using above, you need to create an Amazon account. You can start out with a free seller account and still get access to the scanning app. Eventually, you will want a paid Amazon seller account, but no need to worry about that now!

Related Post: Retail Arbitrage 101: The Ultimate Guide for Buying Retail and Reselling on Amazon

Which Products Sell Best on Amazon?

You’ll be surprised to see all different kinds of items selling on Amazon. But not every product that you scan is going to be a #1 best-selling item.

There are products listed on Amazon that aren’t really selling well at all. You want to avoid those products! There’s no reason to buy an item, send it to Amazon, and then just have it sit there for years. Even if the profit looks good on the app, if it never sells, you’re not going to make your money back!

To help you know which items sell better than others, Amazon shows us an item’s BSR or “Best Sellers Rank.” In the free Amazon Seller App, the rank is shown just below the item name.

BSR Example of an Item ranked 16,000 in Clothing

In the Socks example, this item is ranked 16,273. More accurately, it is ranked 16,273 in the Clothing category. This is a good rank!

Ranks are separated by category so the number for a “good” rank can really vary from category to category.

I teach a lot more specifics in my Amazon Boot Camp (as well as giving my personal rank guidelines), but in general, you are looking for a low(ish) number. If an item is ranked #1 in clothing, then it is literally the #1 best-selling clothing item on Amazon at that time. If an item is #1,000,000, then it probably doesn’t sell very often.

One thing that trips up new sellers is when there is no rank shown in the app. This can mean a few things:

  • The item is so new to the Amazon marketplace that no one has bought it yet
  • The item has never sold before (even if it has been available on Amazon for years!)
  • The item is in a category that doesn’t track BSR

Whatever the reason, I recommend that new Amazon sellers only buy already ranked items.

As a general rule of thumb, you can use 50,000 as a maximum across the board.

I promise that sticking with lower ranks and only ranked items will save you from wasting your initial money.  It will make finding products a little harder because of the tight restrictions, but you will thank me later!  Once you get more familiar with the process of buying products to sell on Amazon, you can come up with your own rank guidelines and go more on “instinct” if you prefer.

New vs. Used Items

If you’ve sold or shopped on eBay, you may have seen things like a used set of dishes, a used Nintendo that’s missing a controller, or a Lot of used clothing.

On Amazon, buyers are looking for New items. In many categories (like Clothing and Grocery), Amazon does not allow you to sell Used items at all.

So if you are sourcing in stores or around your house, you only want to look for items that are truly New and in their original retail packaging.

For the categories that do allow some used products to be listed, I would hold off on them in the beginning.  Again, you really want to get your feet wet with proven items/practices.  Once you get more familiar with this process you can add in some used items if you desire.

The big exception to this rule is Used Books which do sell well on Amazon.

Sourcing Secrets

You can probably tell that sourcing inventory is the most significant component of your success as an Amazon seller. You need to only source products that:

#1 Make a profit

#2 Actually sell on Amazon

This is why it is so important to use either the Amazon Seller App (on your phone) or the Amazon Revenue Calculator (on your computer) before you buy products in the store or online.

I’ll be blunt here: most items you scan in the store are not going to work for Amazon FBA or even be profitable at all.

I don’t mean for that to sound discouraging because you will still find PLENTY of great items to send to Amazon. Remember, MANY sellers doing Retail Arbitrage are running six-figure businesses, so there are clearly a lot of profitable items out there!! But just know that you will scan more “duds” than winners….especially when you are new!

The number one thing I hear from new sellers and Amazon Boot Camp students is how they scanned a TON of items but didn’t find anything to sell.   Whether it’s because nothing was profitable or they were restricted in a lot of the stuff.  It’s all par for the course here.

Please expect this to happen!  If you could walk into a store and pull 20 items off the shelf in your first trip then EVERYONE would be selling on Amazon, right?  Remember, this is a real business, and it takes time to learn the ropes.

Some new sellers are so eager to buy inventory that they buy the wrong items. Be patient when you source and you’ll be rewarded with quick sales and big profits!!

I want to share the biggest mistakes that I see new sellers make. These mistakes cause many sellers to give up on their business way too soon. I want to share them with you so that you have the best chance of succeeding!

Mistake #1: They buy items with no profit. This may happen because they “hope” that the selling price will go up or simply because they don’t check their Profit with the Seller App or Revenue Calculator first. You can ALWAYS check your profit BEFORE you buy. This will save you a lot of heartaches (and more importantly lost money!)

Mistake #2: They buy unranked/badly ranked items. This is usually because sellers don’t understand rank or because they “hope” that the item will sell eventually. When items don’t sell, your money is all tied up, and you can’t afford to buy new inventory. Slow-moving inventory can kill your business. Stop guessing and just trust the Amazon BSR!

Mistake #3: They sell low priced items. Many new sellers become enamored with the idea of buying items for $1 and then selling them for $7, $9, or even 11 dollars. Unfortunately, this will rarely yield a profit. Amazon FBA works best for items selling for more than $15. Over $20 is best. Save yourself a bunch of scanning time and immediately reject items that won’t sell for at least $15 (even if you can get the item for free!!).

Listing Your Products on Amazon

After you’ve bought inventory, the next step is to list the items on Amazon.

This step is actually straightforward because, as I mentioned earlier, you are only going to be listing products that are already for sale on Amazon.

That means that as a FBA seller using the Retail Arbitrage methods that I recommend, you do not have to:

× Take photos of your exact products
× Make a new listing page
× Write descriptions and keywords that will help your items sell

All you need to do is find the existing product listing that’s an exact match for the product you bought locally.

Amazon has a video training about how this works. If you haven’t created your account yet, don’t worry about following along step-by-step. I just want you to see how easy the process is for matching to an existing listing.


This video is not specific to FBA sellers, so it ignores one crucial step. You can’t see it for long in the video, but I want to show you this one part of the listing process. You need to tell Amazon that you want to use the FBA program for your items.

Once you’ve found the matching listing and you’re entering your price and condition, you also need to choose your Fulfillment Channel. You will have to toggle on “Advanced View” to see this option:

Option to select Fulfillment by Amazon

This is your chance to select the FBA option (the 2nd button). This is really important because if you choose the 1st button, then your item will be available for sale immediately. So if someone bought it, you would have to ship it to the customer right away (Merchant Fulfilled).

When you choose the second option, you’ll see (as the note explains) that your item will only be available for sale when Amazon actually receives your items in their warehouse.

So that’s actually the most important thing to get right!

The other important part here is choosing your price. You’ll generally be matching the lowest price of other sellers who are also using the Fulfilled by Amazon program. Other Prime sellers are your main competition.

Luckily, it’s easy for you to edit your price at any time. So you can always put one price in now while you list and then go back and reprice your inventory after it arrives at Amazon.

In fact, it’s important to reprice your inventory often to make sure that you get sales. For example, maybe you list a product for $25 because that’s the lowest price on the day you bought it. But in a few weeks, other sellers are selling it for $23.

Buyers will be more likely to buy your product if it’s the lowest priced Prime offer. Of course, sometimes you get to raise your prices, too :). It’s a good idea to check!

Prep Your Items to Send to Amazon

After you’ve listed your first group of items, it’s time to send them to Amazon. But you can’t just throw them all in a box as is! There are a few steps you as the seller must do to prep your items.

The main thing you need to do is to put a special barcode label on each of your products. This barcode label is unique to your Amazon selling account. This is so that when Amazon has 10 boxes of Popcorn from 10 different sellers, they know which boxes belong to which seller accounts.

There is a way to generate and print these labels during the listing and shipping stages of creating your shipment to Amazon. It’s up to you to apply the label to each item.

Sometimes, products will need additional prep work. Amazon has specific instructions but here are a few general examples:

  • A liquid in a glass jar would need to be bubble wrapped. Your barcode label would go on the outside.
  • A t-shirt would need to go inside of a poly-bag. Your barcode label would go on the outside.
  • If you are selling a bundle of 2 different items (say a shampoo + conditioner), both would need to go inside the same poly-bag or box. Your barcode label and a “do not separate” sticker would go on the outside.

Amazon expects the items they receive to be ready to ship to the customer. They do not want to do additional prep work for third-party sellers other than just adding the product to a shipping box.

Shipping Your Items to Amazon

This is the final step that you are responsible for in the FBA system. At this point, you have bought items, listed them and set your price, and prepped them for shipment to an Amazon warehouse.

Remember, part of the beauty of Amazon FBA is that you can send in a bunch of items at once to Amazon (instead of shipping one at a time to the customer).

Amazon will decide which warehouse(s) will receive your items for each shipment that you create. They may want you to send all of your items to just one warehouse, or they may assign you three different warehouses (this is more common than one warehouse).

You can then use Amazon’s partnered shipping rates with UPS or FedEx to ship in your inventory at a deeply discounted price. This is MUCH cheaper than just taking the box to UPS on your own and paying their standard rates.

For example, I recently shipped a 40-pound box of items to a warehouse in California for about $9.00. Of course, sometimes I have to ship across the country to the East coast, and that would be more expensive. Still, the shipping rates are an excellent deal (and part of what makes FBA profitable).

Note that you do have to ship your items to the assigned Amazon Fulfillment Center. You cannot drive your inventory to one of their warehouses if you happen to live nearby. I know that seems like a way to save money, but Amazon does not allow for it!

Once you pack up your boxes, buy your discounted shipping from Amazon, and drop off your boxes with UPS or FedEx, the items are essentially in Amazon’s control.

Your shipment will then enter the following stages:

Delivered: This means that UPS or FedEx has Delivered the box to the assigned Amazon warehouse.
Checked In: This means that Amazon has scanned the shipping label on the outside of your box and acknowledged receipt of your box(es).
Receiving: At this stage, Amazon workers are unpacking and actively scanning and receiving your individual items. Items will be available for sale at this stage!
Received in Full/ClosedThis indicates that Amazon has received all of the items in the current shipment.

Once your items are received in full, you should see your items for sale on the Amazon.com website. Exciting!!!

Live Inventory and Sales

Live inventory means that it’s time for sales!

Like with “Mikes Super Store” that I showed you earlier, your items will now display as options to Amazon customers. They will see your item “Sold by YourStoreName and Fulfilled by Amazon.” Prime Members will also see the Prime logo next to your offer.

So, what happens when a customer buys one of your items?

Well, first of all, you don’t have to do anything!!

Amazon will locate your item, put it in a box, and ship it to the customer. If the customer is eligible for free 2-day (or same day) shipping, Amazon will make sure that happens (even if your product is in a warehouse in Virginia and the customer is in Montana). You will not be charged for shipping to the customer!

Once Amazon has shipped the item, your account will be credited for the selling price minus any Amazon fees. This number should match the “Gross Proceeds” show in the Amazon Seller scanning app. The more items you sell, the more sales are credited to your account.

Then, once every two weeks, Amazon will transfer your account balance to your bank account. When that happens, you’ve just received your first Amazon “paycheck” – congrats!

Remember, fees and other charges are deducted from your account balance. If you sell an item for $20, Amazon may subtract $7 in fees (remember to check the Amazon Seller App or Revenue Calculator to know your fees!). That means that the other $13 is put in your account balance.

Amazon will also deduct monthly fees and storage fees on occasion. The cost of shipping your items to Amazon with FedEx or UPS will also be deducted.  You will actually see your account go into a negative balance to start with after sending your first items because the shipping is deducted at the time of shipping, so you need to sell some of those items to put you back into the positive.

Some new sellers are surprised when their account balance is lower than they were expecting. And occasionally skeptical sellers will ask me, “How is it possible to make a profit after all of the fees, subscription costs, and shipping charges?!”

Trust me, it is possible! If you source the right items and know your fees in advance (do I sound like a broken record yet?) then you can make sure you are turning a profit.

It also gets easier to make a profit after the first few months. When you are brand new, the shipping fees can really take a bite out of your sales balance. But after a while, your inventory will start to sell more consistently, and you’ll have higher sales in the end.

The power of a scalable Amazon FBA business is really in the ability to keep sourcing, keep shipping, and keep selling. By reinvesting your profits on new inventory, your growth potential is endless!

Ready to Start Your Own Business Selling on Amazon FBA?

I hope you are as excited about Amazon FBA as I am! But to be honest, Amazon selling is really a case of “seeing is believing.” There’s nothing like scanning profitable products or getting your first sales to really see the magic of FBA.

So let’s take a look at how someone gets started in their own Amazon FBA business!

Once you have decided that you want to actually start the process of selling stuff on Amazon, you will need to have an Amazon seller account and a few basic supplies before you can get going.

The seller account is required so you can use the scanning apps I mentioned previously. I know it may feel like jumping the gun since you haven’t found anything to sell yet, but it’s a catch-22 in this case.

Without the Amazon Seller App, you won’t be able to tell which items in the store are profitable! This will lead to lousy buying decisions and possibly a loss of income, so it’s best to go ahead and create your seller account.

Create Your Amazon Seller Account

The following video is from my paid training course, Amazon Boot Camp. I’m sharing it with you here for free so that you can go ahead and create your account the right way. The video will walk you through the steps of setting up your Amazon Seller Account.

From this point forward, if you are a person who prefers to see things laid out in a step-by-step fashion and enjoy watching videos to learn, then it’s a good time to check out my Amazon Boot Camp video course!

If you enjoyed the above video, you’ll love the rest of the Amazon Boot Camp because I will really get into the good stuff about profit, sales rank, FBA shipping plans, and much more! I leave no stone unturned when I teach Amazon selling 🙂

Start Looking for Products to Sell on Amazon

Once you set up your account (whether you do the free one or the paid one), you can start using the Amazon Seller App to scan items in stores or your house. Here is my tutorial on how to use the different Amazon seller scanning apps and how they work.

You are well on your way to finding profitable products to resell on Amazon!

Don’t Forget the Supplies for Your Amazon FBA Business

Like I mentioned previously, you do need some basic supplies before you can start selling items on Amazon. You can wait until you have found some profitable products before getting these supplies, but you will need to buy them before you create your first FBA shipment.

The basics are a computer, smartphone, printer, labels, boxes, shipping tape, and a scale.

You can see all of our recommended Amazon Seller tools here. This will give you the exact versions of everything that we use!

Learn From Someone Who’s Been There!

Amazon Boot Camp 3.0 Course Image

There is no point in going at this alone! As a new seller, you are going to have lots of questions, and the Amazon help pages aren’t always the easiest to understand.

I created the Amazon Boot Camp with you in mind. You see, when I started selling on Amazon, there were no step-by-step courses available to learn how to sell on Amazon.

I had to figure it all out on my own — with lots of Google searches and navigating through forums. Unfortunately, these days I actually see a lot of misleading or just plain wrong information about selling on Amazon.

That is why I decided to create the first complete step-by-step video course for getting started on Amazon.com using the Fulfillment By Amazon program.

Over 4,000 people have gone through this course and are selling on Amazon today because of it!

In our Amazon FBA course you get:

  • Screen Share step-by-step instructions to get your Amazon business up and running in no time! (Steps that literally take you from clueless and curious all the way to profitable business owner)
  • Plus, you get access to our members-only private Facebook group where we have tons of successful Boot Camp students who are happy to provide help and inspiration

You can see all of the details of the Amazon FBA course right here.

Top Ecommerce Platforms for Different Industries

Top Ecommerce Platforms for Different Industries

Today all you need to run a business online is to set up an Ecommerce website and decide what you’re going to sell and for how much. There is a great variety of Ecommerce sites on the market, and you should have no problem finding a platform that suits your business. In this article we’ll take a look at the best platforms for 5 of the most popular types of online businesses today.

Shopify is best for food and drink Ecommerce

Best Food and Drink Ecommerce Platform: Shopify

  • Price: $29/month to $299/month
  • Number of templates: 150+ (18 designed specifically for food and drink businesses)
  • Commission on sales: 2.4% + 30 cents – 2.9% + 30 cents

Launching a food and drink business is unique in a number of ways. Unlike an apparel store, for example, before you even go online you need to make sure to take care of a number of health considerations involving food safety. You need to follow state and local health department regulations, and if you run your foodservice business out of your home kitchen, you’ll probably need to have it inspected by local authorities. Not only that, you need to make sure to include labels and warnings for people with food allergies, as well as information for people who have religious dietary restrictions.

Before you get there though, you need to do some market research. Is there a market for your food product? Is it trendy, and if so, will it be a flash in the pan that’ll disappear in 6 months? Can you product be easily sold online and shipped?

As opposed to in a brick and mortar eatery, customers won’t be able to sample your products before purchasing. Therefore, you need to make sure the packaging is appealing and that it’s presented in a rich and attractive format.

With Shopify, users have access to well over 150 templates, including 18 that are specifically designed for online food and beverage vendors. These 18 templates cost between $140-180 each, but they provide a rich and attractive platform for selling your wares.

Shopify offers a variety of themes

Shopify themes are easy to sort and browse, including over 150 templates to choose. 

A look at the templates:

The 18 food and drink templates include themes like “local” ($160), a stripped-down, clean and attractive theme that is perfect for small local eateries. It links to your Instagram and gives information about the store’s location, hours of operation, and goods and services, without making the site look busy or cluttered.

The “Focal” theme ($160) has a grid-style that Shopify says is ideal for lifestyle and product imagery. It’s a very sound option for eateries that want to feature a series of pictures of their products, such as the Focal demo on the Shopify site, which is set up for a cookie store and shows detailed, close-up photos of one type of cookie after another. “Pacific” ($180) is a similar theme that is also geared towards stores with large inventories.

“Alchemy” ($150) is a theme suited for sites that want to run deep, large, high-resolution images across the screen. It’s better for creating depth and highlighting an overall establishment like a café rather than specific menu items.

If your eatery online sells a couple items and would like to feature large, bold imagery (say, of one of the giant donuts you sell, or the artisan gyros you carve on your food cart) of a single product, then the “Marker” theme ($160) is a great option. According to Shopify, Maker is “an editorial-inspired design made for big, bold imager.”

Does your business have a story? Do you want to have rich, immersive text and videos tell the story of your product? If so, the “Palo Alto” theme ($180) is an ideal option for businesses with a small catalog who want the space and ability to add text that leads the reader through their story and their mission, and also incorporates large homescreen videos and photos.

All themes include SEO tools, drop down navigation support, free updates, social media icons, built-style and color palettes, free stock photos, customizable content sections, and all are mobile-friendly.

On Shopify you can set up a wholesale channel which runs tiered pricing and syncs your inventory automatically. You can run the entire business off a central dashboard and create customer loyalty programs at any time.

If your online food business steps out into the real world, you’ll be able to use the Shopify point of sale (POS) to run a food cart, pop up, or other entry level offline food business.

Try Shopify Today


BigCommerce is best for apparel vendors

Best for Apparel Vendors: BigCommerce

  • Price: $29.95/month – $249.95/month and higher (enterprise package by quote)
  • Templates: 100+ (only 7 are free)
  • Transaction fees: None

Designers with a keen eye for fashion have more opportunities than ever to pursue their passion thanks to the internet.

Before you get started running an online apparel store, there are a few things to consider. First off, you need to figure out your niche and your identity. Are you making baby clothes or maternity wear? High-dollar business attire? Custom-made sneakers? See if there is a market for your designs and how you can carve out a little corner for yourself in a crowded industry.

When you launch, as a brand-new outlet you may want to offer some introductory sales and coupons to new customers to get the ball rolling. You’ll need an Ecommerce site that can accommodate this, and with BigCommerce, coupons, discounts, and gift cards are provided with every pricing plan.

BigCommerce is a highly-customizable Ecommerce platform used by both small- and medium-sized companies and clients like Cargill, a major international conglomerate. It is mobile ready and fully scalable as your business grows.

BigCommerce makes checkout easy for your customers, with a one touch PayPal plug-in and instant check-out. It can also fully integrate on eBay, Amazon, Facebook, Pinterest, and Google Shopping.

BigCommerce has several unique themes and templates

BigCommerce helps you build your online store with simple, yet beautiful, designs. 

In addition, the platform has tools to reduce shopping cart abandonment, including synchronized inventory tracking. Shipping quotes, product ratings and reviews, and professional reporting tools are standard on all accounts, and everything should stay up and running with a promised 99.9% uptime rate. Not only that, but BigCommerce won’t charge any commission on your sales.

BigCommerce can present your designs on 33 templates created specifically for fashion and jewelry, covering everything from kid’s clothing to men’s formal wear. These templates are rich and detailed, which is especially important since customers won’t be able to try the clothes on in person.

That said, only 2 of these templates are free, and the rest range in price from $145-$235.

Following your vision and dream to become a fashion designer is a big move that shouldn’t be taken lightly. With BigCommerce, you can build an online store that can turn your vision into a thriving business.

Visit BigCommerce Now


Wix is best for toymakers

Best for Toymakers: Wix.com

  • Price: 2 plans that include an online store, Ecommerce at $16.50/month and VIP at $24.50/month.
  • Templates: 60 available for online stores
  • Transaction fees: No commission

You’ve got an idea for a toy that could be the next fidget spinner or Rubix cube, and now you’re trying to figure out how to get this idea to sprout wings. Basically, you’d be hard pressed to find a better option than Wix. This website builder is known for its drag-and-drop interface, as well as being one of the most user-friendly options on the market. For a small business owner setting up an online store, you probably won’t have a tech guy on hand to navigate a complicated website that requires some familiarity with coding.

While there are hundreds of templates available on Wix – one of the company’s main selling points – there are currently 60 designed for online stores.

Getting started with Wix is easy, thanks to its wide variety of templates and themes. 

There are 2 payment plans on Wix for online stores, the Ecommerce plan at $16.50/month and the VIP plan at $24.50/month. They are both essentially the same—with unlimited bandwidth and 20GB storage—but by paying extra for the VIP plan users are provided with a professional site review and 10 email campaigns a month, which could be put to good use promoting your business. In addition, Wix accommodates coupons and discounts that can be used to attract new customers.

With Wix, users can easily track their sales and manage shipping through the platform, and take advantage of PayPal integration. Wix also automatically optimizes your site for mobile devices.

The platform makes sure that all transactions are secure – and they take zero commission on any of your sales.

The Wix Ecommerce options do not automatically include Facebook integration, which is one drawback. If you want to use the world’s largest social network to make sales for your business, you’ll need to install a third-party app which can be purchased through the Wix market. The app is developed by Shopial, and costs $6.99/month. There is also a free version but it only allows you to display up to 9 items.

And while Wix is certainly user-friendly, you may run into some issues at times, which is when the 24/7 customer support will come in handy.

Start Wix Today


Volusion is best for electronics and gadgets

Best for Electronics and Gadgets: Volusion

  • Price:  $15/month (mini), $35/month (Plus), $75/month (Pro), $135/month (Premium)  
  • Templates: 49 (11 free, 38 cost $180)  
  • Transaction fees: 2.15% on credit card sales

If you’re looking to set up an online store for gadgets and sell electronics, take some time to gauge the market and act accordingly. Is there something that sets your gadgets apart from the crowd? Do they represent a vision that your company has?

Once you’ve figured out how to pitch your offerings in a crowded marketplace, take a look at Volusion as your Ecommerce base.

Like Wix, the platform has an easy-to-use drag-and-drop interface that keeps you from wasting time on web design and wrangling code.

Volusion offers beautiful themes

Volusion helps you create your online store with customizable templates. 

Volusion offers 4 separate pricing plans, starting at just $15/month for the “mini” plan, up to $135/month for the premium plan. All provide online support and secure checkout, but with mini you’re limited to up to 100 products. That may be enough for a small online store just getting off the ground, but it doesn’t include ratings and reviews, newsletters, and abandoned cart reports. If you spend an extra $20/month you can move up to the Plus plan, which allows you to sell up to 1,000 products and gives you 3GB of bandwidth to keep things running smoothly. The most popular plan – Pro – runs $75/month and allows you to sell up to 10,000 items.

More importantly though, with the Pro plan includes eBay and Amazon integration, and allows phone orders, customer loyalty plans, and a dedicated account manager.

Volusion offers built-in SEO tools to help your store get noticed by customers, as well as extensive social media integrations, including with Facebook. You also have access to detailed analytics reporting, to help you keep track of your stock and your operating costs.

When it comes to customer service, with Volusion you can access their online chat 24/7, as well as a toll free number where you can speak directly to a service representative.

Try Volusion Now


Bluehost + WooCommerce is best for selling books

Best for Books: BlueHost + Woocommerce

  • Price: $13.99/month (starter), $17.99/month (Plus), $31.99/month (Pro)
  • Templates: 14 (2 free, 12 cost $39 – also works with WordPress themes)
  • Transaction fees: None, all charges processed through PayPal  

You love to read and collect books, and now you want to turn your hobby into a business.

Because there are so many online bookstores – including giants like Amazon – you should try and focus on a niche that will set you apart. You could focus on self-help books, or parenting guides, or just young adult fiction. Whatever you decide, you need to think of a way to set yourself apart from the big fish, and start collecting the inventory you need.

Once you’ve settled these issues, give WooCommerce a try. It’s an Ecommerce plugin that turns your WordPress website into an online store.

Set up is easy and you manage the store entirely from your WordPress dashboard.

The price range varies from as cheap as $13.99/month for the entry level “starter” plan, to $31.99/month for the pro plan. All come with unmetered bandwidth, customer support and SSL certificate, but that’s where the similarities end.

With the starter package, you get only 100 GB of website space, while on the other plans it is unmetered. You’re also limited in the number of domains and email accounts with the starter plan, and receive only $100 in marketing offers, as opposed to $150 for the plus package and $300 for the pro package.

Payment is built-in with PayPal and Stripe, keeping things simple. Security is also a selling point, with payment plans coming with SSL certificate and a dedicated IP.

And to help you keep track of all those book titles piling up in your garage, WooCommerce includes stock levels control, which – like everything else on the platform – you can manage from your mobile device.

Furthermore, there is a great deal of freedom with WooCommerce, because you can implement literally hundreds of WordPress plugins to customize your site as you see fit.

Try BlueHost + WooCommerce


Bottom Line

Though setting up an store online is significantly easier than a storefront, there are still many variables to consider. You have to determine your “identity” as a vendor and a brand – what are you selling, who is it for, and what sets you apart. Once you’ve laid the groundwork, finding the right Ecommerce platform for your business can play a major role in whether or not your small business dreams come true.

Ecommerce 101

What Do I Need to Know Before Launching My Online Store?

An Ecommerce website builder is a program that lets you build, customize, and run an online store. A complete Ecommerce solution and the best Ecommerce sites will come with the tools to walk you through the entire process: hosting, design, pricing and payment options, marketing tools and reports. These are the signs that you’ll be using the best Ecommerce platform available. First, consider how much you’ll sell. If you anticipate heavy traffic, a solution that offers lots of online storage space, inventory, and bandwidth is ideal.

Next, decide on the level of customization you’d like, to ensure you’ll have the best online store builder for you. Many Eshop site builders offer attractive templates ready-to-use, while others come with HTML for more seasoned web designers. Check for must-have features such as payment security and sales reports.


Also, be sure to provide enough payment and shipping options for your customers, and look closely at tools such as the ability to create discounts, loyalty programs, or gift-wrap options on your website. Not all website builders will offer the same options, and some may charge for extras. All of these considerations effect the success of your online shop and how you sell online. Finally, go with a program that is easy to use and has a solid customer support team. A well-designed builder should be simple yet effective. The less time you have to spend figuring out the program, the more time you’ll have to run your business.

Ecommerce 101

Over the past several years, Ecommerce has transformed how people buy and sell online. The Internet provides a fast and easy way for people to purchase things without having to visit an actual store. An online store can reach customers anywhere in the world. In fact, online shopping has become so popular that many vendors sell only online with no physical location. Ecommerce also facilitates the purchase of digital media such as downloadable music and movies: with no physical product, vendors can boast truly instant delivery. There are many Ecommerce companies, and it’s important to understand which of the best Ecommerce sites let your online shop flourish as you sell online.

Today’s top Ecommerce site builders take all of these factors into account for your Ecommerce website. Many programs are designed to accommodate the sale of both physical and downloadable products. In addition, online businesses are quickly evolving to face times of economic hardship by offering steeper discounts, flat-rate shipping, loyalty programs, and other perks. Many Ecommerce site builders and the best Ecommerce platform options make it easy to run promotions and keep your customers happy. Finally, although the boom in online sales has also opened a potential avenue for fraud and scams, site-builders have managed to stay ahead by offering top-of-the-line site protection and payment security to keep the online marketplace as safe as possible.

The Three S’s of Ecommerce

  1. Storage Space:
    Some Ecommerce site builders put a cap on your sales, so choose one offers you the inventory space and bandwidth to fit your needs. The best Ecommerce platform will let your online shop sell online without limitations.
  2. Safety Protocols:
    Choose a program that offers fraud protection and Secure Socket Layer (SSL) encryption. This is for the protection of you and your customers. SSL technology makes it possible to send online payments securely and is a must-have on all Ecommerce sites.
  3. Site Design:
    Your Ecommerce solution should have a user-friendly interface. The best Ecommerce sites and functions of each tool should be clear and it should be easy to select your desired options. A top-notch site builder will make it easy to build your online store. An extensive FAQ and customer support team can make a world of difference. Also, remember the needs of your customers. Imagine that you’re shopping your own online store. Well-designed menus, filters, and sorting options will minimize the amount of time it takes to find a product and purchase it. Consider also the “look” of your site. Many Ecommerce site builders offer professionally-designed templates that are both pleasing to the eye and can improve a customer’s overall shopping experience. Just like in a physical store, a cluttered and disorganized e shop display will leave customers frustrated and empty-handed, whereas a streamlined and enjoyable buying process will encourage purchasing.